


In late November 1917 Colonel Paul von Lettow-Vorbeck and his men crossed the Rovuma River from German territory into Portuguese East Africa (today named Mozambique). The Schutztruppe was now a carefully selected force of about 300 Europeans, 1,700 Askari and 3,000 followers. The British did not directly pursue the Germans because supply lines, dependent on porters, were over-extended and heavy rain was expected.
Von Lettow was given time and space to reorganise, and he split his men into three main groups and a few small reconnaissance and foraging parties. The Germans acquired arms and ammunition by seizing Portuguese military posts. Crops and cattle were obtained from local villagers who preferred the presence of the Germans to that of the Portuguese, especially as the Germans paid for their provisions with cloth taken from captured Portuguese posts. A Schutztruppe formation commanded by Major Franz Kohl was positioned west of Port Amelia (now named Pemba); it consisted of the 3rd, 11th, 13th, 14th and 17th Field Companies of African Askari and the 6th SchutzenKompagnie (former rifle club volunteers from the German European settler community). Kohl's force had 12 machine guns and a captured Portuguese field gun.

The Portuguese had asked the British theatre commander, the South African General Jacob Van Deventer KCB, for protection for Port Amelia and, in late December, 250 men of the Gold Coast Regiment (GCR) occupied the port. In early 1918 Brigadier General W F S Edwards CMG (Devonshire Regiment) was sent as commander of the Port Amelia Force (PAMFORCE). He split his teeth-arm units into two columns.
Rose Column (ROSECOL) contained the GCR, the Ugandan 4th Bn of the 4th King's African Rifles (4/4 KAR) and the 22nd Derajat Mountain Battery, Indian Army. The mountain gunners were issued with new 3.7-inch howitzers, packed onto mules for transport. Lieutenant Colonel R A de B Rose DSO (Worcestershire Regiment) of the GCR commanded this column.
The Nyasaland 2nd Regiment of the King's African Rifles was used to man the second column, titled KARTUCOL. The 1st and 2nd Battalions (1/2 and 2/2 KAR) formed this column. All the pre-war men from 1 KAR had now been discharged on completion of service, and the Askari in both battalions were young and newly-recruited. Lieutenant Colonel George Giffard DSO (Royal West Surrey Regiment) of the KAR was the column commander.
General Deventer, just like General Smuts before him, had not been able to outwit von Lettow and defeat him in a decisive battle. Now that the Schutztruppe was operating in Portuguese East Africa unencumbered by depots or bases, the only hope the British had of victory was to engage the Germans as often as possible in combat. PAMFORCE was ordered to advance westwards to find and fight the Germans, and to kill or capture as many of von Lettow's Europeans as possible.

2/2 KAR at the Medo action
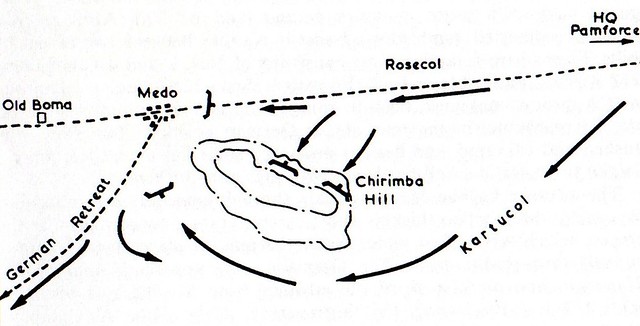
By 9 April ROSECOL was positioned to the east of Medo where a prominent feature named Chirimba Hill dominated the approach. Kohl's observers were on the hill which was about 200 metres high and three and a quarter kilometres long. Brigadier Edwards decided to continue ROSECOL's advance along the road north of the hill but to send KARTUCOL to the south to loop round the hill and cut the road that ran southwest from Medo.

On 12 April 2/2KAR, under the command of Lieutenant Colonel W T H Gregg DSO (Royal Irish Fusiliers) moved off through the bush on a compass bearing to get south of Chirimba Hill. Meanwhile ROSECOL was advancing along the road and the sound of gunfire from the Indian mountain gunners could be heard, along with the response from the German gun. At 1100 hours 2/2 KAR had its first contact in a knee-deep swampy location. The contact soon turned into an area ambush that had been sprung by three of Kohl's field companies.
2/2 KAR quickly splashed through the mud to form a U-shaped perimeter, repelling attacks on all three faces. The British Askari were fighting from holes scooped in the mud whilst the Germans had the advantage of operating from better ground. The Schutztruppe kept attacking from different directions, swiftly moving their machine guns around to provide fire support. 2/2 KAR fought where it stood and was severely pressed. Most of the battalion were young Askari but they were held together by the experienced non-commissioned officers (NCOs), who could be seen nonchalantly taking pinches of snuff in between shouting fire orders.
2360 Lance Corporal Sowera DCM was awarded a Bar to his Distinguished Conduct Medal, the citation reading:
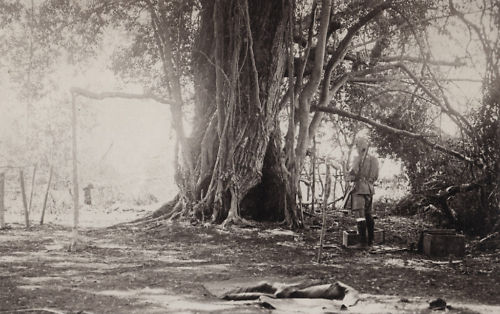
He decided to climb a tree with his Lewis gun (to obtain a better field of fire), where he remained nearly all day doing excellent work while his Number 1 handed up the drums (of ammunition) from below. The tree was repeatedly hit and on one occasion a burst of machine gun fire lopped off a branch above his head. Later on Sowera took command of a section that had become shaky after losing its NCO, and danced an ngoma (war dance) up and down the firing line to hearten his men.
As ammunition ran short runners were sent to the rear for fresh supplies, but the enemy machine gunners were waiting and knocked them down. 2/2 KAR was in a tense situation when 1/ 2 KAR caught up with it.
1/2 KAR joins the fight
1/2 KAR, under the command of Lieutenant Colonel D W Reynolds (York and Lancaster Regiment), was following 2/2 KAR through the bush, and the battalion's porters had been closed up with the main body. The battalion had just put out a picquet on Chirimba Hill when the enemy fired on 2/2 KAR. This firing caused the porters to panic, drop their loads and flee to the rear. Whilst attempting to stop his fleeing porters, the 1/2 KAR Transport Officer Captain John Lewis Broom MBE, (Welsh Regiment and Military Labour Corps), was killed.
With difficulty, the transport was reorganised and 1/2 KAR advanced in U formation to the sound of the guns. The battalion found 2/2 KAR's left flank and the two units completed a square. But the Germans observed the situation and launched violent attacks on the junction point. Around 1430 hours the enemy cut the telephone wire back to PAMFORCE HQ. A party of two of the battalion's signallers and Sapper Samuel Maurice White, (Royal Engineers Lines of Communication Signal Company), went to repair the cut. The party walked into an enemy ambush and Sapper White was mortally wounded.
The battalion had to fight in the same swampy conditions as 2/2 KAR was experiencing, and effective leadership was vital in ensuring that the fierce enemy assaults were driven back. Sergeants L L Nicholson, (South African Infantry), and R T Roberts, (Royal Welsh Fusiliers), were killed in action along with two Askari. Company Sergeant Major G Hobday, (3rd Battalion Royal Sussex Regiment) was slightly wounded. Fifteen Askari and 11 machine gun porters were also wounded. Sergeant Roberts had only joined the Battalion on 30 March, and he was killed by one of the last enemy shots fired.
2/2 KAR reorganises
Before an ammunition supply got through to 2/2 KAR the Askari were down to five rounds per man. Bayonets had been fixed and grenades prepared for a final battle in the swamp. Brigadier Edwards had sent a GCR company to assist in the fight south of Chirimba Hill, but by the time that the Gold Coasters were in a position to be effective dusk was falling and Major Kohl broke off his attacks and withdrew. Lieutenant Colonel Giffard moved KARTUCOL up the slopes of Chirimba Hill where the battalions tended to casualties, fed, replenished and reorganised.
2/2 KAR had lost 10 Askari killed or died of wounds. Lieutenant E D Perodeau (ex-Canadian infantry and Middlesex Regiment), Sergeants T A Smart (4th Battalion The Royal Welsh Fusiliers), F Heesom (6th Battalion The Rifle Brigade) and 33 Askari were wounded; 4 Askari were missing. Three Military Medals were later awarded to 2/2 KAR Askari for bravery at Medo. The recipients were Serjeant Mateyo and Corporals Kawanga and Ndala. The 2/2 KAR Medical Officer, Captain Barry (Royal Army Medical Corps) and his team had performed valiantly despite the dressing station being repeatedly swept by enemy machine gun fire. As usual the Germans removed their casualties from the battlefield and their losses were not known. Acting Company Sergeant Major G Hobday later received a Distinguished Conduct Medal:
For gallantry at Medo, on 12th April, 1918, in remaining at his post-when wounded and thereby setting a fine example of courage to all ranks. In addition, he has commanded a platoon with exceptional ability and courage, and has been of the greatest assistance to his company commander.
The enemy had withdrawn hastily from what obviously had been a wet-weather training camp, as many of his stores such as musketry tripods had been abandoned. On the following day the battlefield was searched thoroughly in order to locate abandoned porters' loads. Medo had been a very tough fight on bad ground of the enemy's choosing, and it could have gone the other way if the NCOs of both KAR battalions had not kept a grip on their Askari. On 17 April Lieutenant Colonel Gregg went to hospital suffering from jaundice and Major E F Bradstock MC (formerly South African Cape Corps) took over command of 2/2 KAR.
Mbalama Hill
PAMFORCE moved off in pursuit of Kohl's troops, and 4/4 KAR and the GCR were heavily engaged on the afternoon of 17 April. The next day KARTUCOL took over the lead with 1/2 KAR in the van. Small pockets of enemy were encountered and dispersed. The next day 2/2 KAR led and soon No 2 Coy bumped Kohl's 17th Field Company. The Germans immediately brought their machine guns into action. No 2 Company took cover and replied with Lewis guns and Stokes guns (mortars). Two deserters from the enemy's 13th Field Company came over with information. PAMFORCE slowly moved forward against a German rearguard that fought and then quickly withdrew. Water was the important factor; the Germans defended water sources until the last minute and PAMFORCE fought for them. The men and mules had to be watered daily.
On 24th April 1/2 KAR fought up to the foot of Mbalama Hill on the Koronje road. During the day the Battalion lost Sergeant (Acting Company Sergeant Major) H R Evans (King's African Rifles) killed in action. Lieutenant H Bracewell (6th Bn The Lancashire Fusiliers) was badly wounded, as were several Askari.
The following day Lieutenant N Stewart (King's African Rifles) took a reconnaissance patrol from ‘B' Company and found that the enemy were in strength east of the hill and across the road. Captain P T Brodie MC (formerly 2nd Rhodesia Regiment), the Officer Commanding ‘B' Company, brought all his men forward to join Stewart. Brodie now made his own reconnaissance of the hill accompanied by Sergeant Morris and a platoon. Brodie's group reached the summit of the hill and were fired upon at short range. What happened next is best told in the words of citations:
Distinguished Service Order for Captain Patrick Tait Brodie MC.
For conspicuous gallantry and devotion to duty. He was told to take a hill with a platoon. When he got within fifty yards of the top he was fired on by a Maxim and some thirty rifles. Only two of his men stood fast, and with them he bombed the enemy off the hill. By his dash and gallantry in taking this hill he deprived the enemy of a most advantageous point from which to deliver destructive fire on his men. He did very fine work.
and
Distinguished Conduct Medal for Lance Corporal (Acting Sergeant) R. Morris MM (Liverpool Regiment).
For conspicuous gallantry and devotion to duty in an attack on a hill. He was constantly in advance of the firing line, leading and encouraging his men in the face of heavy machine-gun and rifle fire, and was the first to reach the crest of the hill. He set a magnificent example of courage and determined leadership, and his wholehearted and gallant support of his company commander alone rendered the accomplishment of this daring attack possible.
2981 Private Daudi was awarded the Military Medal for his bravery during the action.
Captain Brodie only lost one Askari wounded during his fight for the hill. Sergeant A Hendry (5th Bn West Yorkshire Regiment), the Battalion Signalling Sergeant, laid a telephone cable from Battalion Headquarters which was not long enough, and he manned the end of it in thick bush, passing messages until the hill was taken. He was later to become RSM of the Battalion and to be awarded a Distinguished Conduct Medal. ‘B' Company occupied the summit of the hill and on observing this the enemy on the adjacent hills, who had been deployed for an area ambush on PAMFORCE, quickly withdrew.
Conclusion
The actions at Medo and on Mbalama Hill initiated into battle the young Nyasaland Askari of 1/2 and 2/2 KAR. Many miles of tough fighting lay ahead against a well-fed and well-replenished (albeit with Portuguese weapons and ammunition) Schutztruppe. The enemy withdrew towards food stocks that his foraging parties were collecting, whilst PAMFORCE daily marched further away from its base at Port Amelia. Grim attrition ensued, the Germans nearly always fighting from ground of their own choosing. The British had to bury or evacuate their casualties after each contact and just push on, trying to manoeuvre the wily von Lettow into a decisive action. This was an infantry war, and the only infantry units remaining in the field, on both sides, were manned by African Askari.
Note on war graves
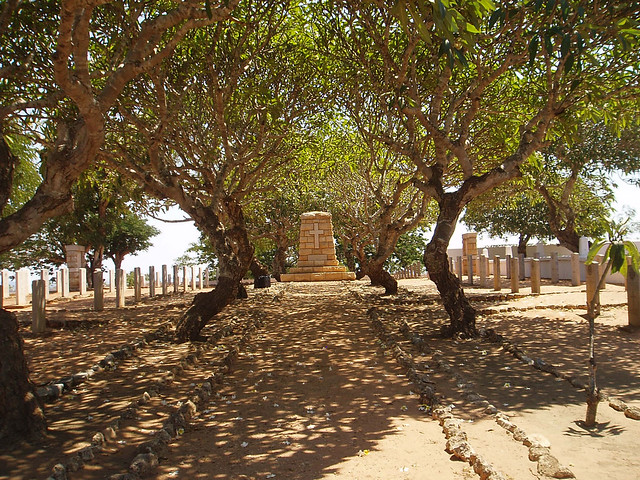
The British dead from the African units of PAMFORCE lie in the Commonwealth War Graves Commission cemetery in Pemba, Mozambique (image below). The African and Indian dead lie in unmarked graves in the bush and they are commemorated on the Pemba Memorial that is located in the cemetery.
Article and images by Harry Fecitt MBE TD.
Related articles on the WFA's website:
The Advance Beyond Kilimanjaro German East Africa (now Tanzania), March 1916
The Battle for Latema-Reata Nek, British East Africa, 11 - 12 March 1916
Indian Volunteers in the Great War East African Campaign
The King's African Rifles at Kibata, German East Africa December 1916 to January 1917
Out on a Limb - the road through Tunduru: German East Africa, May to November 1917
Fighting for the Rufiji Crossing
- War Diary 2nd/2nd KAR (WO 95/5326).
- War History 1st/2nd King's African Rifles (WO 161/75).
- The King's African Rifles by Lieutenant Colonel H. Moyse-Bartlett MBE (pages 391 to 393).
- Historical Record of 22nd Derajat Pack Battery, Frontier Force. (Pages 74 to 77).
- The Gold Coast Regiment in the East African Campaign by Sir Hugh Clifford KCMG. (Pages 242 to 249).
- My Reminiscences of East Africa by General Paul von Lettow Vorbeck. (Pages 229 to 250).
- Tip & Run. The Untold Tragedy of the Great War in Africa by Edward Paice.
- Honour The Officers. Honours and Awards to British, Dominion and Colonial Officers during the First World War by Michael Maton.
- The African DCM compiled by John Arnold.
- The Award of the Military Medal to African Soldiers of The West African Frontier Force & The King's African Rifles from 1916 to 1919 by John Arnold with William Spencer MA & Keith Steward FRGS.
- Recipients of the Distinguished Conduct Medal 1914-1920 compiled by R.W. Walker.
- London Gazette and Medal Index Card entries.