


By the autumn of 1917, the allied forces had advanced from Egypt and were on the verge of advancing into Palestine. Two attempts had been made earlier in the year, but a third attack under General Allenby was planned. On 27th October 1917, the British started a bombardment of Gaza. The Turks had been fed reports indicating that a third frontal attack on Gaza was imminent, but on 31st October, an attack was launched on Beersheba, twenty miles south-east of Gaza. The lightly defended town fell to a daring cavalry charge made by regiments from the 4th Light Horse Brigade of the Australian Mounted Division. As expected, the Turks moved units to defend the area from the successful attack, weakening Gaza’s defences.
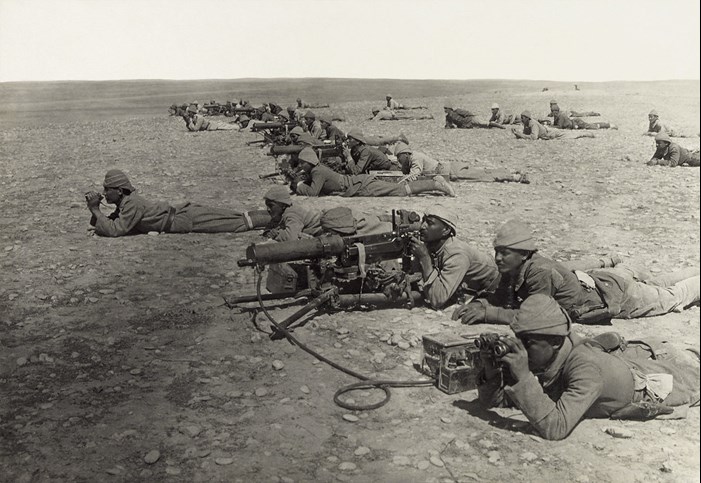
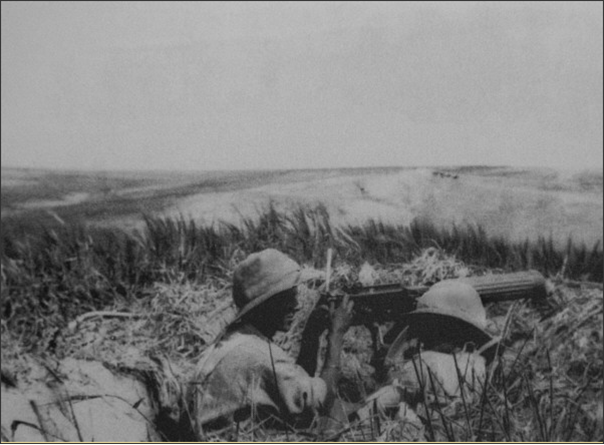
Above: Turkish machine gun corps defending Tel esh Sheria, and the Gaza line in 1917. (Library of Congress)
The fall of Beersheba enabled a successful attack to be made on Tel es Sheria (half way between Beersheba and Gaza); the position, being on high ground, was vital to the Turkish line. This attack was also successful. A further assault was made on Gaza itself. This attack, rather than being direct through the cactus-hedged suburbs was made from the coast. This was the final straw for the Turks, they fell back from the Gaza defences, and for virtually the first time in the war there was a gap that could be exploited by cavalry.
Whilst the infantry advanced through picturesque orange groves into the town of Gaza on 6th November the three mounted divisions were ordered to cut the Turks off by driving in a north-westerly direction for the sea. There were several opportunities for cavalry charges, one of these at the village of Huj on 8th November was made by 1½ squadrons of Warwickshire Yeomanry and 1½ squadrons of Worcestershire Yeomanry. This small band of horsemen (part of the Australian Mounted Division), charged at a much stronger Turkish position, without any covering fire from artillery or machine guns. Turkish artillery was turned and fired point blank at the onrushing yeomanry but the momentum of the charge was too much and in a few minutes the Turks fled, leaving behind many of their dead, seventy prisoners and numerous artillery pieces.
Due to stiff rearguard actions, many being less easy to overcome than the position at Huj, the majority of the Turkish troops managed to escape the encircling movement; however the Turks were totally disorganised by the British advance and fell back in almost complete disorder.
The pursuit by the British infantry and cavalry inevitably slackened over the next few days. In the line of the cavalry’s advance was the village of Junction Station. This marked the point where the railway line running west out of Jerusalem met the north-south railway. If the village was captured, Jerusalem would be cut off from the sea, and the route to the Mediterranean would be open for the mounted troops.
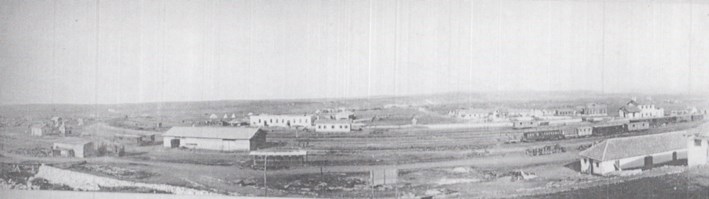
Junction Station (IWM Q12705)
Before Junction Station could be taken, however, two villages had to be taken that stood in the way - Katrah and El Mughar.
The Battle of Mughar Ridge, officially known by the British as the Action of El Mughar, took place on 13 November 1917 during the Pursuit phase of the Southern Palestine Offensive of the Sinai and Palestine Campaign. Operations occurred over an extensive area north of the Gaza to Beersheba line and west of the road from Beersheba to Jerusalem via Hebron.
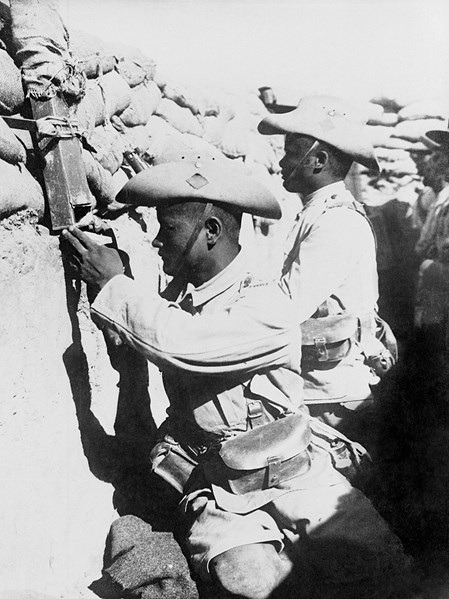
3/3rd Gurkha Rifles holding front line trenches (IWM Q12935)
One soldier’s story.
Isaac Walker Thompson was born in Pudsey in 1886 to George and Harriet Thompson; he had at least three brothers all of whom were to serve in the war. After the family moved to Ravensthorpe (51 Garden Terrace), Isaac worked at the Ravensthorpe works of Dewsbury Corporation’s sewage department, and along with his brother John, was a member of Ravensthorpe Liberal Club. Isaac enlisted in Dewsbury on 8th May 1915, joining the King’s Own Scottish Borderers; after eleven weeks training he went to Gallipoli, joining the 1st Battalion (29th Division) on 18th August.
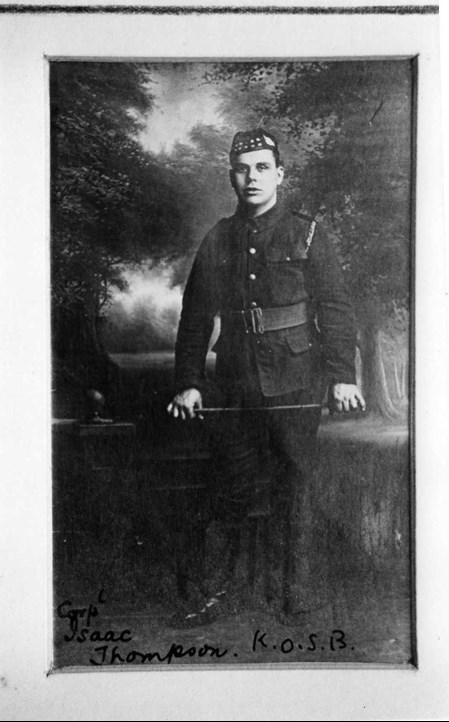
Following the evacuation, the 29th Division went to France, taking part in the first day of the Battle of the Somme, Isaac being wounded on this day, receiving a gunshot wound to his left leg; Isaac’s brother, John Alfred Thompson was injured on the same day, whilst serving with the 10th Battalion, Yorkshire Regiment.
Isaac spent some time in hospital in Torquay, and after some home leave and further training in Edinburgh was posted to the 1/5th Battalion of the K.O.S.B., part of the 52nd (Lowland) Division, joining the battalion in February 1917.
During the Palestine campaign, Isaac (or ‘Ike’ as he seems to have been known) was wounded twice, being in hospital at one stage with septic poisoning. It is not clear when he received these wounds, but it is likely to have been during the earlier battles at Gaza. Clearly recovered from his wounds he was with his battalion when, on 13th November, it was ordered to assist the 1/4th K.O.S.B. in an attack on El Mughar.
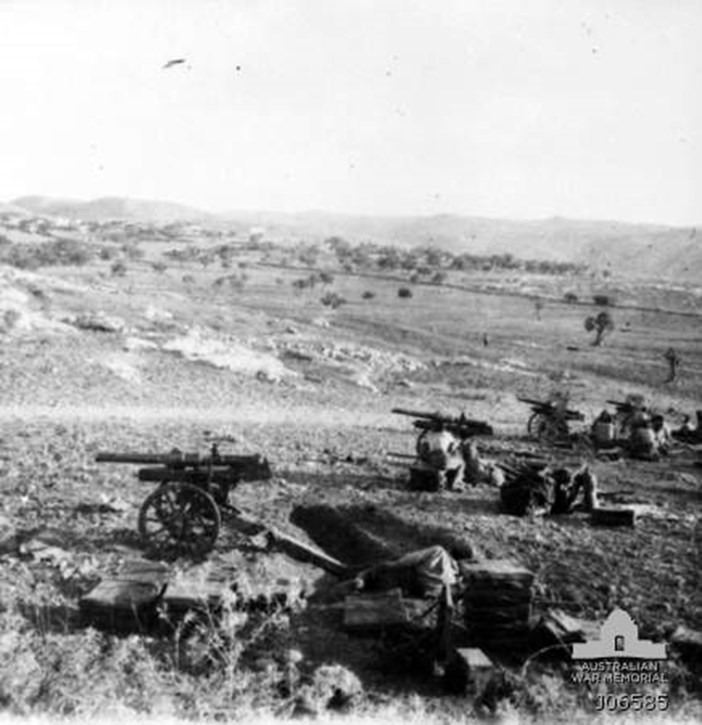
Hong Kong (Indian) mountain gun battery (Photo taken during Australian Light Horse operations near Beit Tahta during the Jerusalem Operations)
The two K.O.S.B. battalions had marched into position on the reverse side of a hill in the early hours of the morning. After spending a cold night without blankets and breakfasting on half rations, the battalions advanced over the brow of the hill where the village of El Mughar - their objective - was pointed out lying amongst groves of cypress trees on a small hill at the end of a ridge. Below the ridge was a flat plain; it was likely to be difficult ground to attack over if the Turks put up resistance.
Although disorganised by the sudden advance, the Turks had placed machine guns behind the cacti hedges, and their artillery had taken up positions on an adjoining ridge, giving them a clear field of observation over any attack. The neighbouring village of Katrah (approximately a mile away) was to be attacked by two battalions of Royal Scots Fusiliers (part of 155 Brigade, 52nd (Lowland) Division.)
The 1/4th K.O.S.B. advanced under a hail of machine gun and shrapnel fire. About 400 yards from the edge of the village, the troops came across a dry river bed from which they returned the Turkish fire. Realising that the advance on El Mughar was stalling, the 1/5th K.O.S.B. were ordered forward to assist, unsurprisingly they too were met with intense fire and joined the 1/4th Battalion under cover in the river bed. Meanwhile, the attack on Katrah was also held up.
The Brigadier-General in charge of 155 Brigade (Brigadier-General Pollock McCall) had joined the K.O.S.B. in the river bed and due to the problems encountered was contemplating calling for artillery support to suppress the Turkish fire. It was now early afternoon, since the advance was ordered at 7.45am and the battalions had come under fire at 10am, little had been achieved; however help was at hand. To the left of the infantry were the yeomanry of the 6th Mounted Brigade (comprising 1/1st Berkshire Yeomanry, 1/1st Buckinghamshire Yeomanry and 1/1st Dorset Yeomanry) being part of the Yeomanry Mounted Division.
Above: 1/1st Dorset Yeomanry Machine Gun section (courtesy Keep Military Museum)
At 3pm 1/4th K.O.S.B. moved forward, using the cover of a dip known as Wadi Jamus, and approached to within two miles of the Mughar Ridge. The yeomanry advanced first at a trot, then to a canter, and when within 100 yards charged into the Turkish positions to the north of the village.

The famous painting by James Beadle of this Charge depicts the Buckinghshire Yeomanry's part in the action, led by the left handed Major Bulteel. The Bucks Yeomanry lost 6 ORs killed, 3 officers (one mortally) and 45 ORs wounded and were awarded one DSO and one MC in the action.
Seizing the opportunity Brigadier-General McCall grabbed a rifle and personally led the two battalions of Kings Own Scottish Borderers in a charge to the Turkish positions. The War Diary of the 1/4th K.O.S.B. describes how, at 4pm, the battalion “...made a final rush, driving the enemy from all his positions, in the gardens and cactus hedges, and forcing him into the open behind the village...”
After a few minutes of hand to hand fighting, the Turkish troops realised that discretion was the better part of valour and threw their weapons to one side and surrendered.
The Yeomanry had cut off the Turkish retreat, and over a thousand prisoners were taken. The Royal Scots Fusiliers had also taken their objective of Katrah, however the real success was the fact that the way was now clear for an advance on Junction Station. This was taken early the next morning, 14th November, by a brigade from the 75th Division with support from armoured cars; there was no Turkish opposition.
The day’s casualties for the 1/5th K.O.S.B. were one officer and 18 other ranks killed, plus a further two officers and 110 other ranks wounded. The 1/4 K.O.S.B. lost slightly more heavily, having three officers and 26 other ranks killed, plus 9 officers and 138 other ranks wounded. The 1/4th and 1/5th Royal Scots Fusiliers between them suffered fatal casualties of one officer and 26 other ranks; the three regiments of yeomanry had one officer and 15 other ranks killed on 13th November.
One of the casualties of the 1/5th K.O.S.B. was Isaac Thompson. Isaac’s wife received a letter of condolence from Private Joseph Shore, who had been ‘Isaac’s chum since coming out to Palestine’. The letter described how “...Ike did not suffer, death being instantaneous. Some of his chums and myself attended the funeral. He was buried with every respect. All of the boys in the company send you their deepest sympathy.”
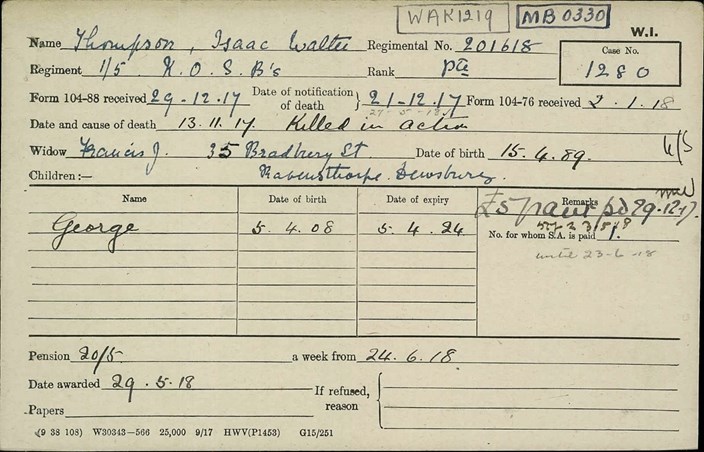
Above: The Pension Record Card for Issac Thompson (WFA Pension Record archive)
Although the letter relates how Isaac’s comrades attended his funeral, Isaac unfortunately does not have a known grave. All the other casualties of the 1/5th K.O.S.B.’s action on 13th November are buried at Ramleh War Cemetery, about five miles north of Junction Station, in the modern state of Israel.
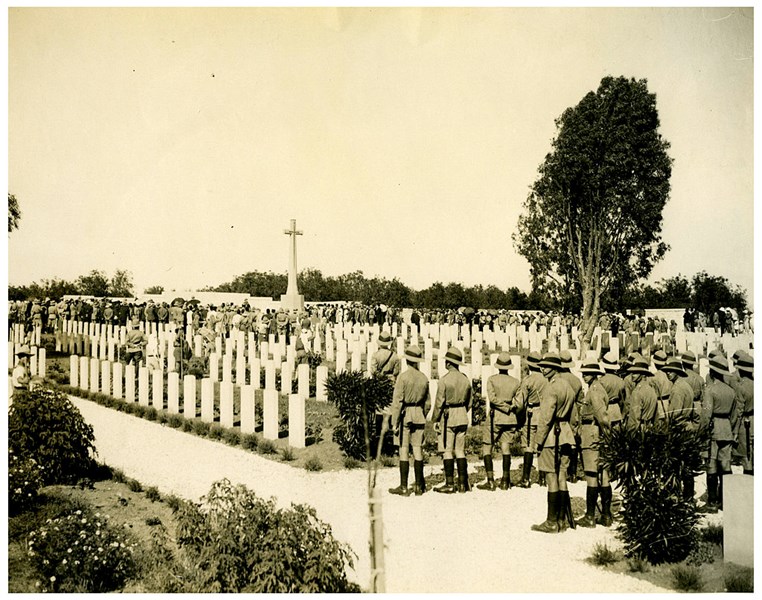
Unveiling of Ramleh War Cemetery on 6 May 1927
Isaac is commemorated on the Jerusalem Memorial to the Missing (photo, below) which lists the names of over 3,000 men who were killed in Palestine and Egypt who have no known graves.

After the capture of Junction Station, Allenby’s forces continued their advance; unlike on the Western Front, much progress had been possible. Since the breakthrough at Gaza, fifty miles had been covered, with about 10,000 prisoners and 100 artillery pieces being taken (this represented about one third of Turkey’s troops in the region and a half of its artillery). Despite these impressive statistics, Jerusalem still had to be taken. Allenby received instructions from London not to advance beyond his means, but despite this he decided to press on to Jerusalem.
By now, the wet season had started, and the roads and tracks that crossed the Judean hills, which stood in the way of an advance on Jerusalem, had become virtually impassable; in these conditions the advance ground to a halt. The Turks chose at this point to launch a counter-attack, which was halted after some desperate fighting. Despite the conditions, the British somehow managed to advance again. These advances were made against a demoralised enemy who soon melted away when attacked. On 9th December, it was discovered that the Turks had withdrawn, and that Jerusalem was undefended.
Allenby entered Jerusalem through the Jaffa gate at noon on 11th December. Symbolically, and out of religious respect, he entered the city on foot, with other officers following behind; one of these officers was Major T.E. Lawrence.
Allenby’s name was added to the long list of conquerors of Jerusalem, stretching back from stories told in the Old Testament, through to the Crusades. Over 400 years of Ottoman rule was ended, however in order to placate Jerusalem’s inhabitants of all religious persuasions, a carefully worded proclamation was drafted stating that all places of prayer would be maintained and protected.
Article by David Tattersfield, Vice-Chairman, The Western Front Association