The Pope's Nose
Virtually every town and village in the UK lost men during the First World War. The Battle of the Somme, which was fought between July and November 1916, was, for many communities, the battle which caused the greatest number of names to be added to local war memorials after the war.
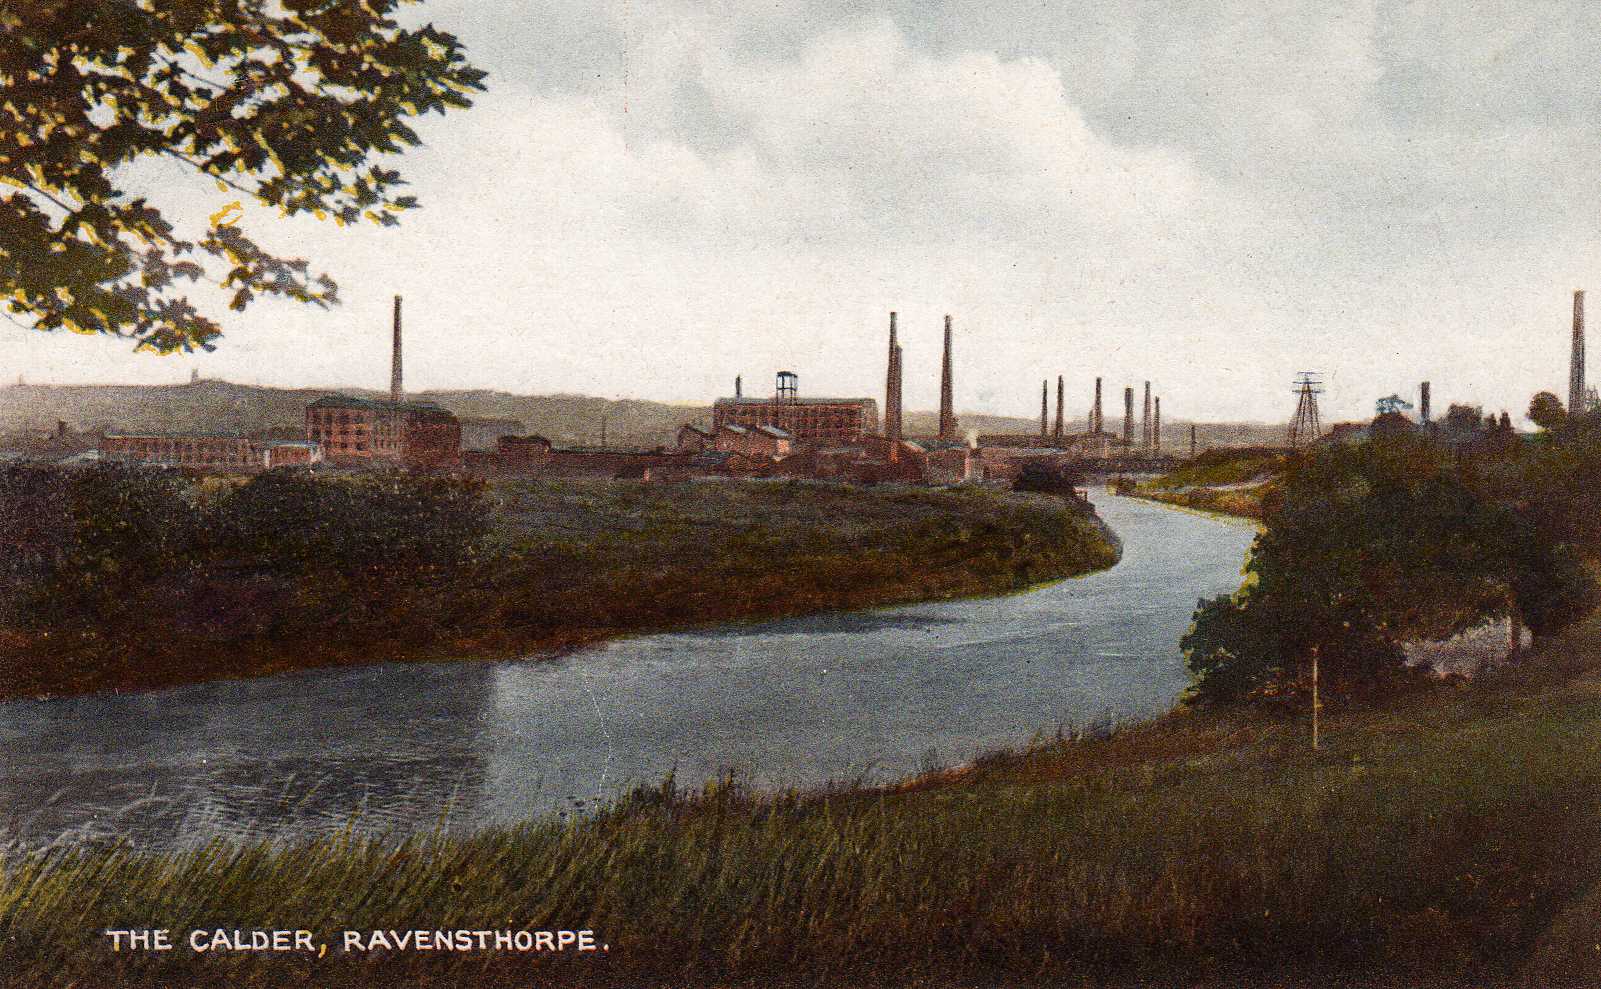
The village of Ravensthorpe, near Dewsbury, in the industrial heart of the West Riding of Yorkshire, was one such community that suffered many casualties in this period.
The British and Commonwealth forces had continually attacked the German lines since the opening of the attack on 1 July and, despite the unprecedented casualties incurred on the first day, managed to make some significant progress during July and August. This success, although costly, was mainly at the southern end of the battlefield. In the north, comparatively little progress had been made: Thiepval, which stood on a prominent ridge, had been surrounded on three sides by the end of August but was still holding out. It had become an annoying salient jutting into the British lines. By holding the village, the Germans were able to prevent the British from occupying the whole of the ridge from Thiepval down to Pozières. A renewed attempt at taking Thiepval was therefore planned for 3 September; this attack was to take place using three divisions, one of which was to be the 49th (West Riding) Division.
The 49th Division was to have two brigades making the attack (the front to be attacked was much the same as that of the 36th (Ulster) Division’s attack on the 1 July): 146 Brigade on the left and 147 Brigade on the right. 146 Brigade had the 1/8th West Yorkshire Regiment on the left of the assault and the 1/6th West Yorkshires on the right. 147 Brigade attacked with the 1/5th Duke of Wellington’s Regiment on the left, and the 1/4th Duke of Wellington’s on the right.
The 1/5th Dukes (which contained many men from Ravensthorpe) were to go over the top from new trenches that had been dug in front of the original (1 July) trenches. These were named the First, Second, and Third Parallels (these were described as rough, but deep and narrow trenches). Two trenches ran from the Second and Third Parallels, heading straight towards the German front line; these were Koyli West Trench (just inside the 1/6th West Yorkshires’ area) and Koyli East Trench.
At 5.30pm on Saturday 2 September the 1/5th Dukes left the village of Forceville and commenced the march to the front line; after crossing the River Ancre at Authuille they assembled ready for the assault in the Second and Third Parallels at 3.45am.
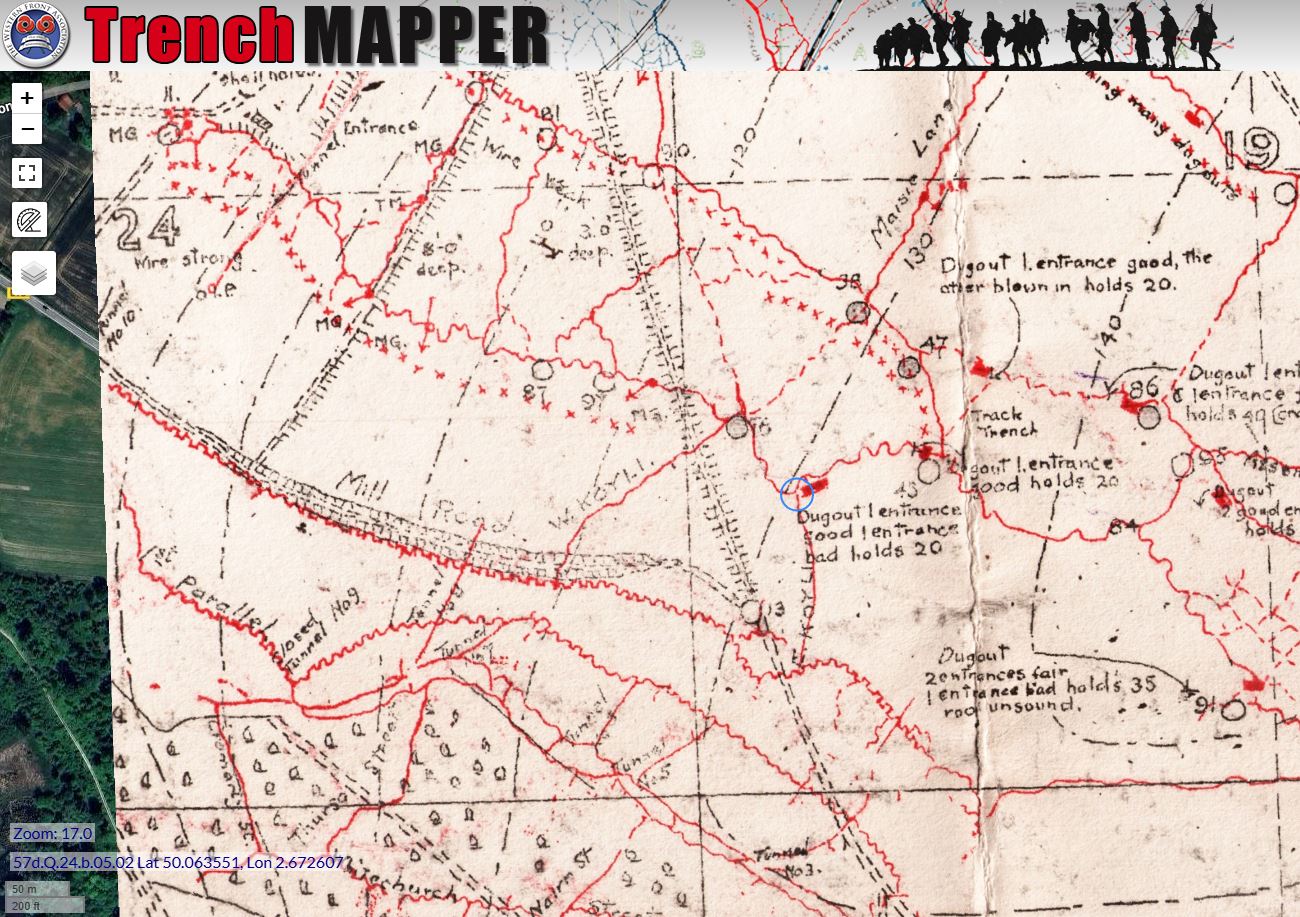
The Battalion’s plan, prepared by the commanding officer, Lieutenant-Colonel H.A.J. Stanton, D.S.O. was for ‘D’ and ‘A’ Companies (on the left and right of the Battalion’s front respectively) to capture the German front line between Points 16 and 54.[1] (These points are part of the trenchmap, below.)

The German defences here were particularly strong; a German salient called the Pope’s Nose was located at the top of Koyli East Trench (the apex of which was at Point 25). The German support line was to be captured by ‘B’ Company (between Points 38 and 66). ‘C’ Company was in reserve.
Meanwhile, the 1/6th West Yorkshires on the left had to tackle a strong trench system called The Triangle (this was between Points 16, 09, and 67), and the 1/4th Dukes on the right had to take the front line from Points 54 to 84 and the support line from Points 66 to 95.
The British hurricane bombardment commenced at 5.10am on 3 September, dawn having broken at about 5 am. A survivor said, “The whole sky seemed to light up suddenly.” At 5.13am the battalion, after hours of nervous waiting, went over the top along with the rest of the West Riding Division, for the first time in the war.
The Attack of the 1/5th Battalion, Duke of Wellington’s Regiment
The War Diary of the 1/5th Dukes describes in two sentences the result of the attack: “The whole attack failed. The 146 Brigade did not reach its objective, and although the 147 Brigade reached their objective, they were unable to hold it.” The details of what occurred are more difficult to establish, especially as each battalion blamed its neighbour.
‘D’ Company of the 1/5th Dukes was to attack astride Koyli East Trench. Unfortunately one platoon, instead of assaulting on both sides of the trench managed to end up entirely on the eastern side. This left a gap in the middle of the company that was due to attack at Point 25 (the Pope’s Nose). The War Diary states that “This would not have mattered if the battalion on our left [1/6th West Yorkshires] had reached its objective. As it was ‘D’ Company had to withstand bombing attacks on its left, from its centre, and later on, from its right.”
Although half of ‘D’ Company did manage to occupy the front line trench between Points 16 and 25, it was impossible to bring ammunition up to them - due, according to the War Diary, to the German block at the top of Koyli East Trench. This resulted in everything having to go over No Man’s Land, in the face of the ferocious enemy barrage; machine guns firing from the rear and the flanks of the attack would have added to the casualties. This inability to cross No Man’s Land was to prove a source of many casualties; it also prevented orders being brought up, messages getting back, casualty evacuation and reinforcements of both men and ammunition.
The other half of ‘D’ Company, to the right (east of Point 25) did receive ammunition at about 7.30am. Even further to the right, ‘A’ Company of the 1/5th Dukes became mixed up with the left Company of the 1/4th Dukes, this caused a lot of bunching between Points 25 and 54. A machine gun was turned on these men, causing the company to split in two, leaving a gap near where the communication trench joins the front line approximately mid-way between these points.
‘B’ Company assaulted the German support line, but only one-third of the men (and probably no officers) seem to have reached it; due to the casualties incurred and a lack of ammunition they were unable to hold onto this position. After recapturing their support line the Germans were able to come down the communication trench and, exploiting the gap that the machine gun had created, turned left and right to attack the men of ‘A’ and ‘D’ Companies in the German front line.
The Battalion’s War Diary reports that “ ‘D’ Company only retired when they had no more bombs, having previously seen the troops on the right [1/4th Dukes and ‘A’ Company of the 1/5th Dukes] retire to our front parallels. They retired from the German front line about 9.30am”.
The History of the 1/6th West Yorkshire Regiment gives details of how, during the preparations for the attack (which would not have gone unnoticed by the Germans) platoons became in a matter of days exhausted remnants of their former selves. The men had to carry stores and ammunition up the steep sides of the Ancre valley to the front line nightly from the 27th August. This lack of rest afforded to the attacking troops would have seriously impaired their fighting capabilities.
The History of the 1/6th West Yorkshire Regiment goes on to report that the Pope’s Nose remained uncaptured,[2] and that machine guns from this position were able to pour fire into the flank of the 1/6th West Yorkshires. Although the first wave of this battalion managed to cross No Man’s Land, following waves were unable to do so, and this battalion’s attack failed early on.
What Happened?
Clearly the Pope’s Nose was the key to the whole attack. It seems that until it was (temporarily) abandoned, machine gun fire from the area of the Pope’s Nose enfiladed the 1/6th West Yorkshires, stopping their assault in its tracks. If ‘D’ Company of the 1/5th Dukes had advanced correctly up Koyli East Trench, it is possible that the Pope’s Nose may have been subdued earlier. Unfortunately, the 1/6th West Yorkshires were unable to restart their attack.
The deepest areas of penetration soon began to be counter-attacked, with the Germans being reinforced from the garrison in the Schwaben Redoubt (this was a series of tunnels situated in the high ground a few hundred yards east of the Pope’s Nose). The 1/4th and the 1/5th Dukes, running out of ammunition and down to a fraction of their original strength were unable to resist and fell back. The Pope’s Nose was reoccupied by the Germans and machine guns were brought to bear on the retreating troops; many were killed as they tried to return to the comparative safety of the parallels.
All the gains were abandoned. Virtually the only British that remained in the German lines were either dead or injured. Only seven unwounded prisoners were captured by the Germans from the 1/4th and 1/5th Battalions of the Duke of Wellington’s Regiment.
Three Ravensthorpe Fatalities
Included amongst the many hundreds of casualties incurred on this day, were three fatalities from the village of Ravensthorpe. Stanley Gawthorpe was either 17 or only just 18 when he enlisted on 28th December 1914.
Stanley lived with his parents William and Ellen Gawthorpe at 35 Tanhouse Street, Ravensthorpe and attended the Congregational Church and Sunday School. Before enlistment he worked for Armitage & Rhodes in the finishing department; in his spare time he played both cricket and football for the Congregational Church teams. On 13th October 1916 Private Ashton of the R.A.M.C., who was an orderly at a hospital in Woolwich wrote to Stanley’s parents. A soldier called Reginald Wood whom he was looking after, on learning that Private Ashton came from Ravensthorpe, asked if he knew Stanley. It turned out that Private Wood had been in the attack with Stanley, and like Stanley was in ‘A’ Company; his story confirmed Mr and Mrs Gawthorpe’s worst fears:
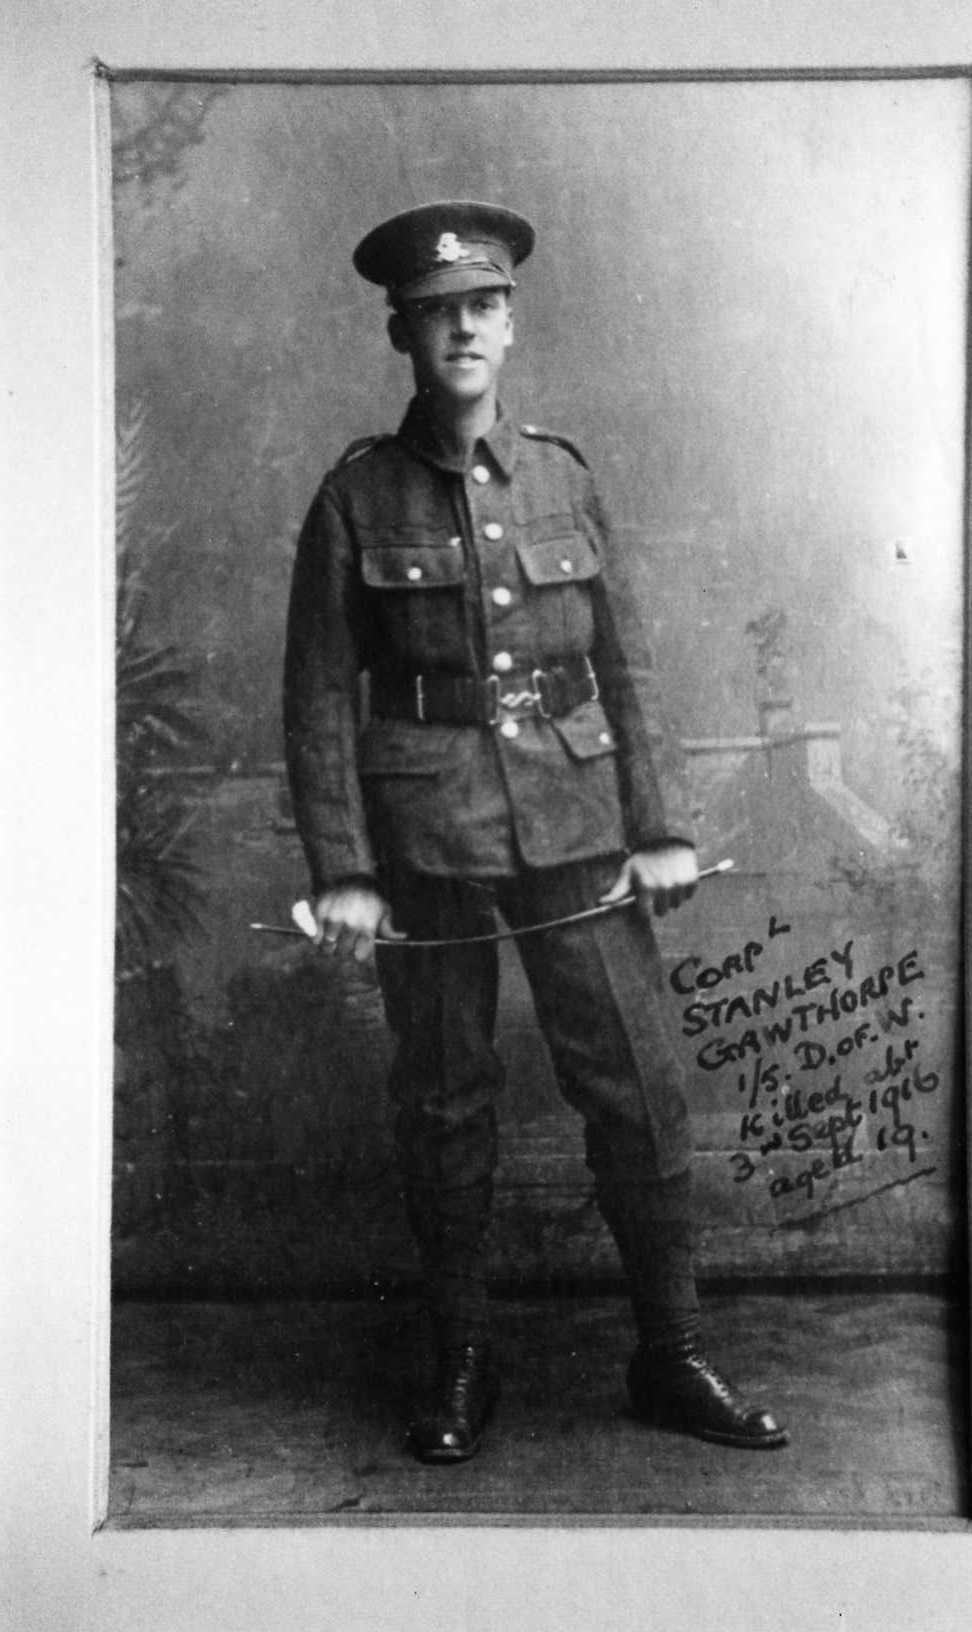
“Stanley and I [Reginald Wood] went over. Stanley and the rest of the company held the first line trench, while I and the bombing company went up the communication trench to bomb the second line.
At this stage, Private Wood’s account becomes slightly confusing, but it seems that although he was in ‘A’ Company, he became involved in ‘B’ Company’s attack on the support line. Although they held the support line for four and a half hours they were forced to retire when they realised that the rest of the battalion had been forced back. He continues:
“We were completely surrounded, so we bombed our way back again to the German front line trench, and there I saw Stanley laid at the mouth of a German dugout. He had severe shrapnel wounds in the chest and legs, and I know for certain he was quite dead.”
Although aged just 19 years when he died, Stanley had risen to the rank of Corporal - no mean achievement for one so young.
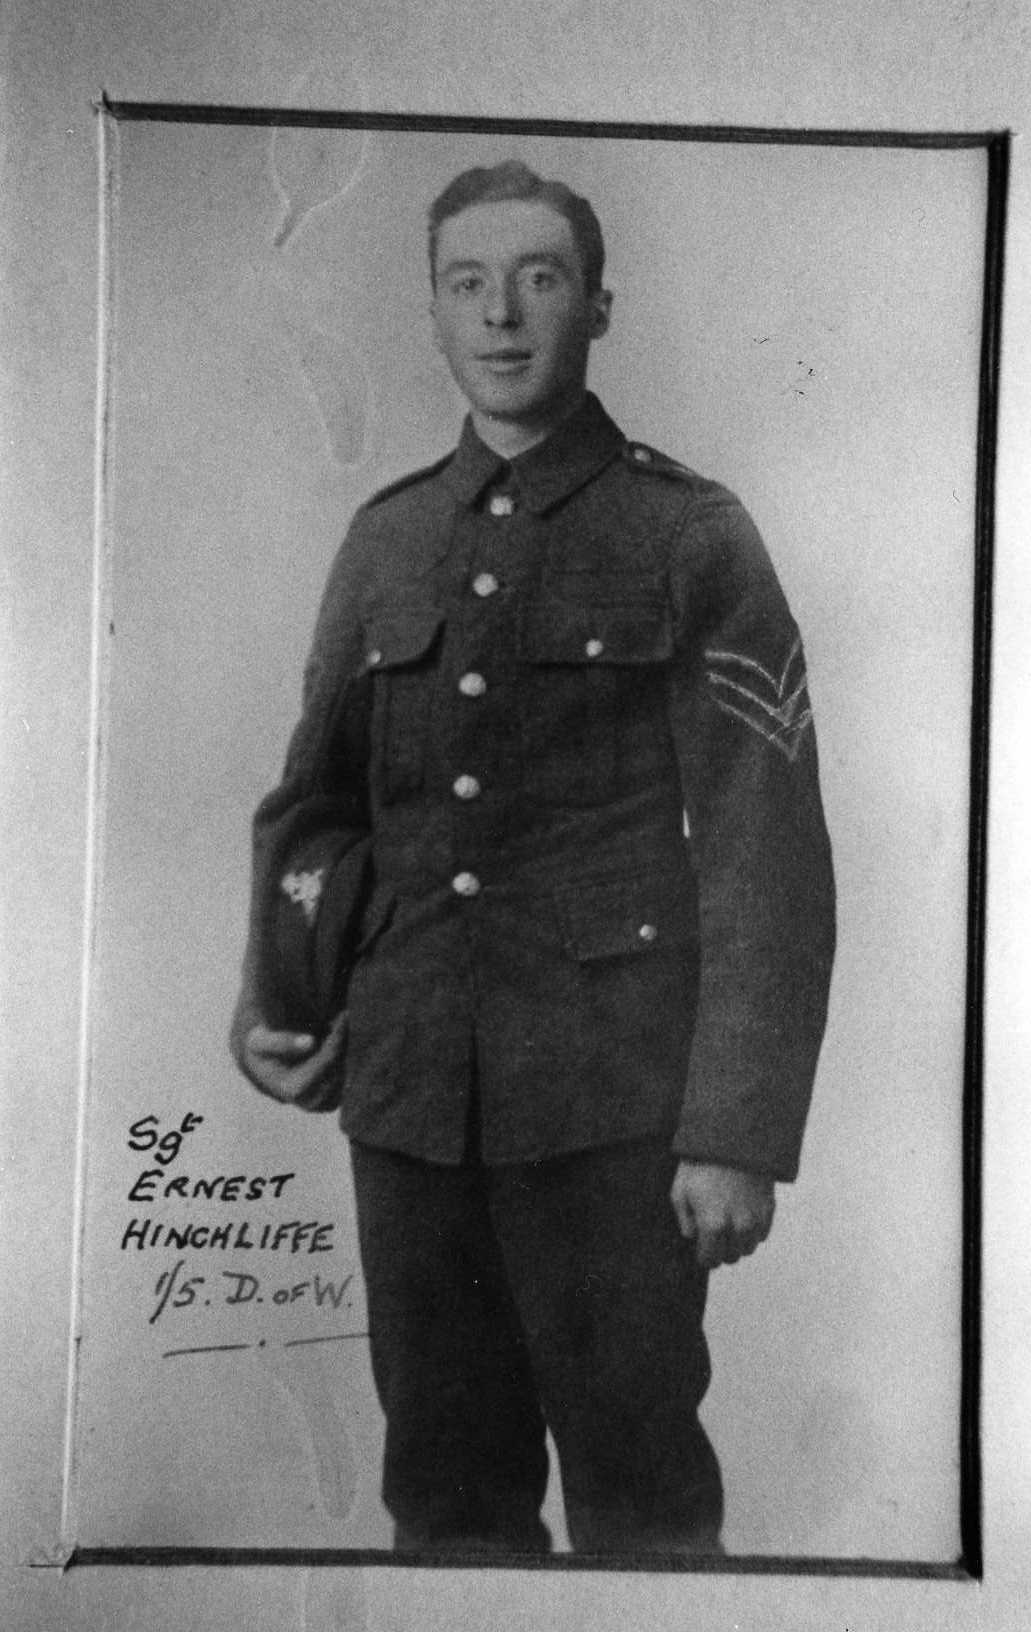
At 21 years of age, Ernest Hinchcliffe was only a little older than Stanley. The Dewsbury News describes him as ‘a pre-war reservist’ (although it is more likely he was a pre-war territorial) who before the war worked for Rawdon, Briggs & Co. of Ravensthorpe. Unlike Stanley (who went to France with a later draft), Ernest arrived with the first wave of the battalion in April 1915. Promoted from corporal to sergeant some time after his arrival, he was posted as missing after the 3 September attack. His parents, Mr and Mrs Fred Hinchcliffe of 839 Huddersfield Road, Ravensthorpe only received formal notification that he was assumed to have been killed in July 1917.
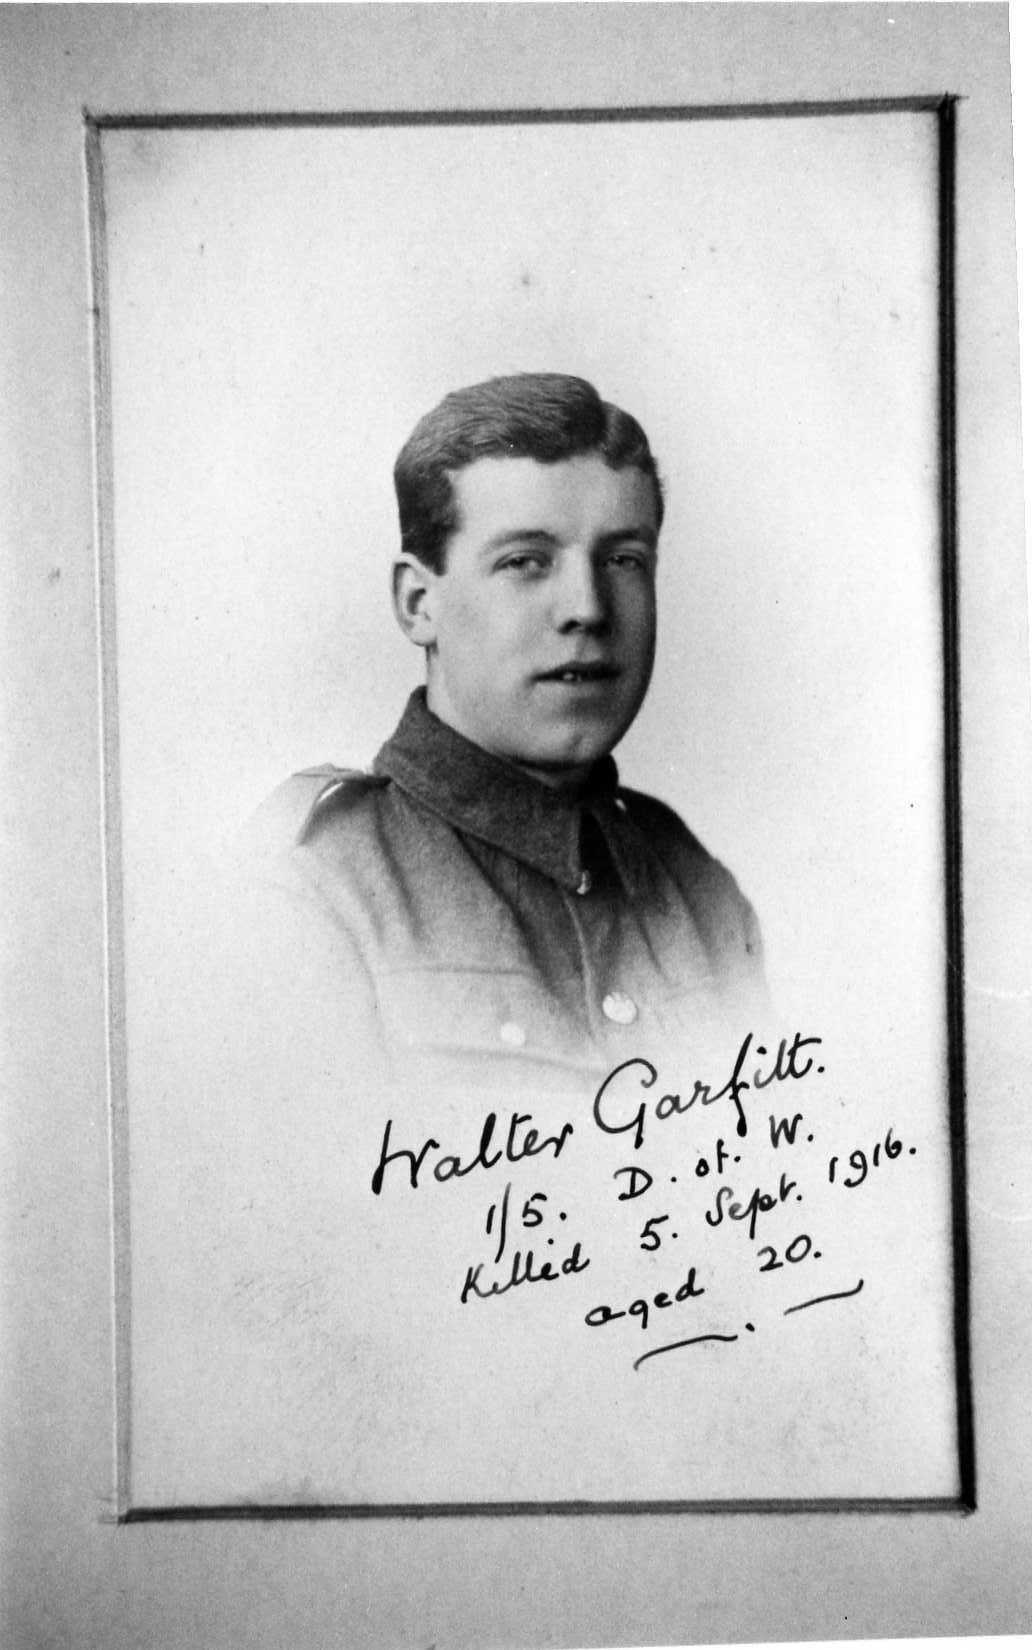
Neither Stanley nor Ernest has a known grave and are commemorated on the Thiepval Memorial to the Missing. The total of 113 men of the 1/5th Battalion, Duke of Wellington’s Regiment who are listed as being killed on 3 September does not include those who later died from their wounds. Some of these men survived several weeks before succumbing while others lasted only a short time. Walter Garfitt fell into this second category.
Walter Garfitt was born in December 1895 to West and Sarah Garfitt. Educated at St. Saviour’s Boys’ School and Mirfield Grammar School, before the war he worked as a clerk at Howroyd and Oldroyd’s chemical works at Tanhouse Street, Ravensthorpe. He enlisted in January 1915 and arrived in France with the battalion in April 1915. When, in December 1915, the battalion was attacked while stationed on the canal bank at Ypres, Walter, although wounded in the leg by a grenade splinter, refused to leave his post until reinforcements arrived. He wrote at the time from hospital in Leicester to his parents at 4 Dearnley Street, Ravensthorpe:
“I am wounded in the right leg, but it is not anything to worry about as I don’t think it shall be long before I am well again. It happened on Wednesday [either 8th or 15th December 1915] and I have been travelling practically all the while. The hospitals are a real treat; the nurses are fine, and there is plenty of good stuff to eat. I was throwing bombs at the Germans, and, of course, they were throwing them back and I got a piece in the leg.”
After recovering from this wound Walter rejoined his battalion and although slightly wounded a month before the 3 September attack, he was able to take part in it. Walter’s father received a letter from Second Lieutenant Charles Floyd dated 9 September expressing his regrets that Walter had died from his wounds on 5 September. Walter’s personal effects were returned the same day by the Company Quartermaster Sergeant.
Aged 20 years, Walter was buried at Forceville Communal Cemetery Extension from where the battalion marched on 2 September to take part in the attack. The cemetery was one of the first three permanent cemeteries to be constructed by the (then) Imperial War Graves Commission after the war. It contains 304 British Graves.
Stanley Gawthorpe, Ernest Hinchcliffe and Walter Garfitt are commemorated on the war memorial inside St. Saviour’s Parish Church, Ravensthorpe.
The Repercussions
Inevitably, after the 49th Division’s failure there was an investigation into what had gone wrong. The G.O.C. of the 49th Division, Major-General Perceval reported to the II Corps:
“I do not consider that any fault can be found with the work of the Divisional or Brigade staffs or with the arrangements or shooting of the artillery.......it is difficult to describe in detail the course of the infantry action, accounts are very conflicting. My general impression is that had the men followed their officers; the troops would have had little difficulty in gaining their objectives.”
Perceval goes on to single out the 1/6th West Yorkshire Regiment. The men failed to follow their officers and “were the first to retire to our own lines.” Although Perceval acknowledged that the inability to bring up ammunition had its effect, he suggested that too many of the 3,000 bombs that the 1/4th and 1/5th Dukes had been given were expended on clearing dugouts. His report suggests that the troops rather than retiring when they ran out of bombs “...ought to have attacked the German bombers with bayonets”. In view of the fact that the British troops were exhausted, out of ammunition, under heavy counter-attack, and being bombarded not only by German artillery, but also by British shells falling short, such a suggestion does seem, with hindsight, unreasonable.
The result of all this was that Brigadier-General Brereton (commanding 147 Brigade) was sacked - this is a little surprising as it was his brigade that did at least take the objectives. It seems that his opposite number in 146 Brigade was spared as he did try to organise another attack that did not take place due to the ‘early’ retirement of the 147 Brigade.
The Pope’s Nose Today
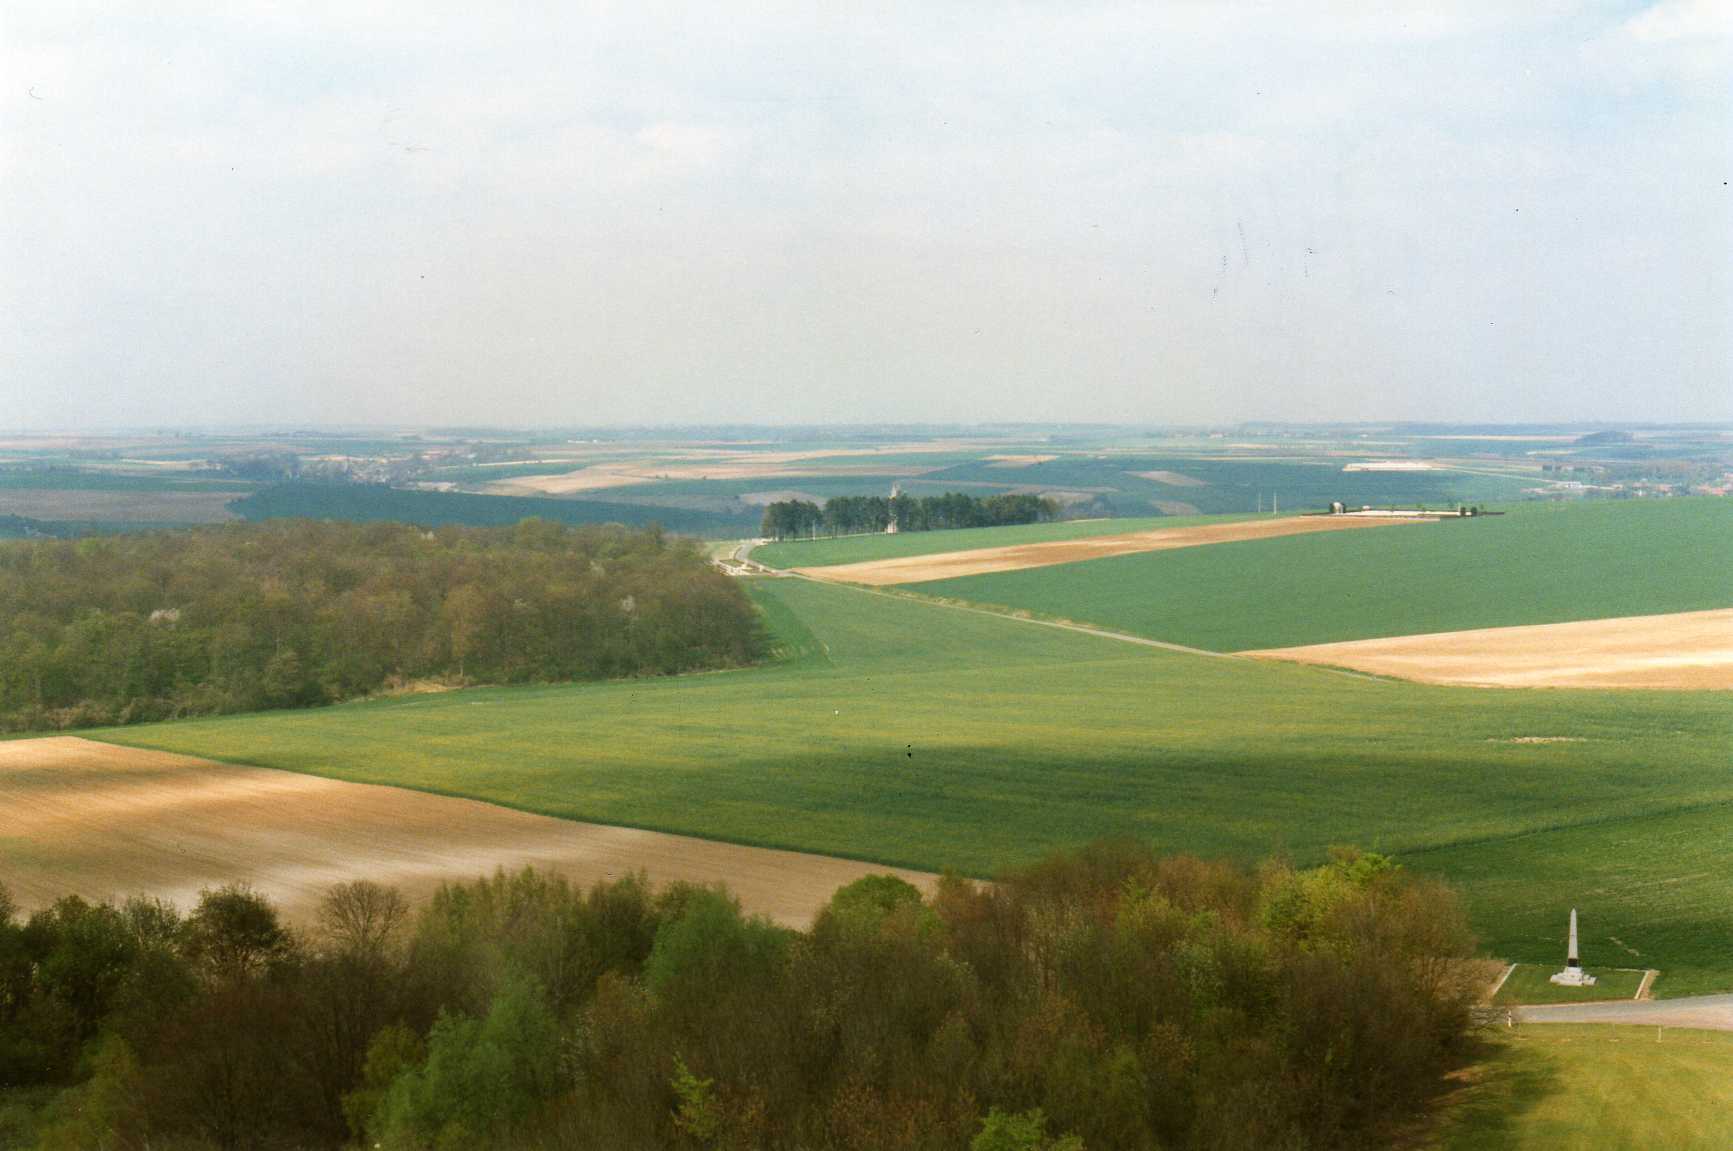
The battlefield today is one of the most visited areas of the Western Front. The Thiepval Memorial to the Missing is close by, and on the other side of the valley are the preserved trenches of the Newfoundland Memorial Park. There are two cemeteries nearby. The Connaught Cemetery now contains 1,278 burials, half of whom are ‘unknown’. Only 36 of the 113 officers and men killed on 3 September in the 1/5th Duke of Wellington’s have known graves, 28 (including all three officers with known graves) are buried at Mill Road Cemetery which is on the edge of the Schwaben Redoubt; because of the unstable nature of the ground many of the headstones have had to be laid flat. The cemetery contains 1,304 graves, 815 (more than 60%) of them being unknown.
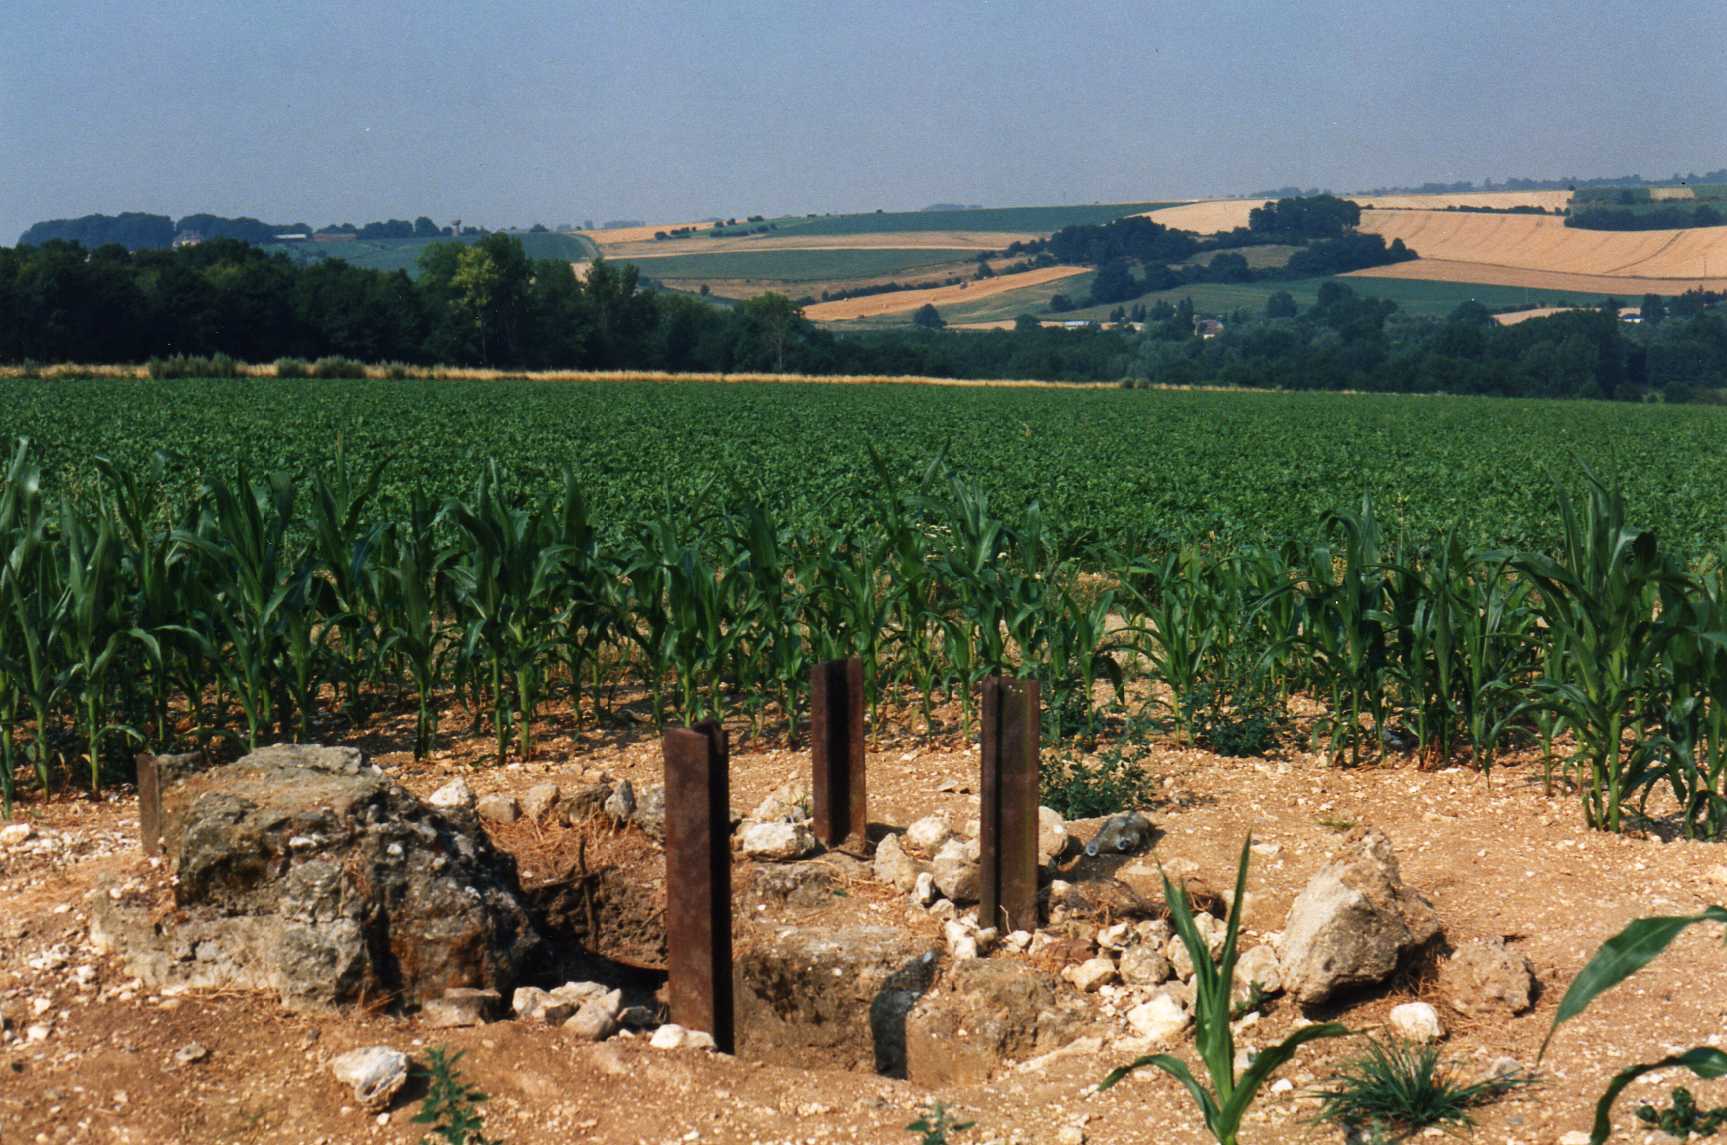
Precisely over the 1/5th Dukes line of attack has been built a tall memorial tower to the Ulster Division. This is one of the most famous landmarks on the Somme, and the front walls of the grounds are on the approximate site of Koyli East Trench. Just to the left of the tower is a fork in the road, one branch being a rough track that leads down to St. Pierre Divion. By walking along the track, you will be parallel, and slightly west of Koyli East Trench; after 130 yards on your right, a few feet into the field are the remains of a machine gun post. While this is probably not the apex of the Pope’s Nose, it is likely to have been part of this position, possibly the post at Point 16. The head of Koyli East Trench (and the apex of the Pope’s Nose) is about halfway between the remains of the post and fork in the road.
None of the original front and support lines that the 1/4th and the 1/5th Dukes attacked can now be seen, however by walking up the left-hand side of the Memorial Tower grounds, at the rear of the Tower is a patch of uncultivated ground. The high ground of the Schwaben Redoubt and the Mill Road Cemetery is away to the right; to the left the ground drops away towards the German support line, but straight ahead is the approximate site of Point 54.
In front of the Tower is a small electricity substation. At this point, the Third Parallel cut across the road. By standing in the road, looking towards the fork in the road, you will be facing the direction of the attack that commenced at 5.13am on 3 September 1916, from which many men never returned.
References
[1] These were the last digits of map references. The exact points were R19c 5.4 and R19c 1.6.
[2] The History of the 1/4th Battalion Duke of Wellington’s Regiment indicates that although the position was not occupied, the Germans were forced to abandon it temporarily. The War Diary of the 1/5th Dukes does not give its opinion one way or the other, although it does state that the block at the top of Koyli East Trench was not cleared.
Becoming a member of The Western Front Association (WFA) offers a wealth of resources and opportunities for those passionate about the history of the First World War. Here's just three of the benefits we offer:
This magazine provides updates on WW1 related news, WFA activities and events.
Access online tours of significant WWI sites, providing immense learning experience.
Listen to over 300 episodes of the "Mentioned in Dispatches" podcast.


