Submarine operations at Gallipoli in 1915
When we think about submarine warfare in the First World War, most people’s thoughts turn to the German use of unrestricted submarine warfare, this being was one of the factors that ultimately brought about the entry of the USA into the war in 1917.
The British and Empire nations’ use of submarines is largely a forgotten subject. However, during the Gallipoli campaign of 1915, British and Australian submarines had an important role.
Dardanelles
The ability of the Royal Navy to attack Turkish shipping in the Black Sea was severely restricted by the Dardanelles which acted as an easily defended bottleneck.
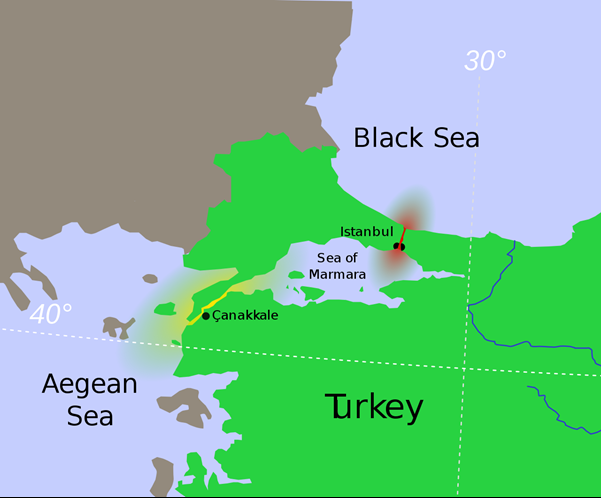
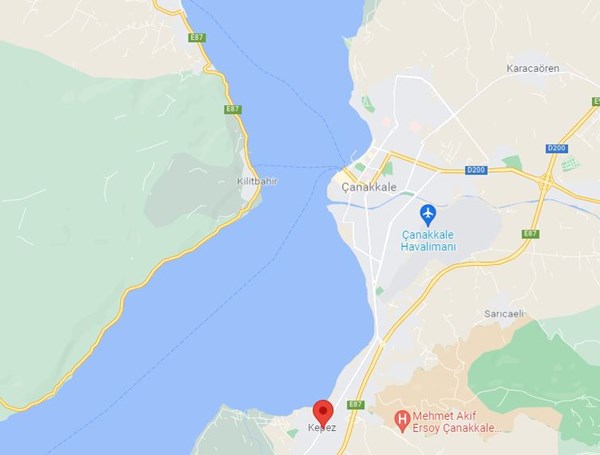
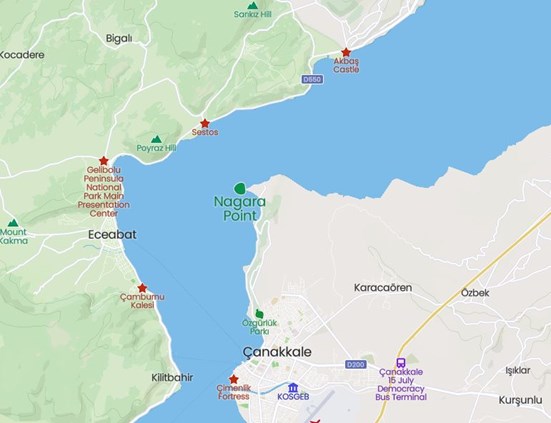
The mouth of the Dardanelles strait is 2.3 miles wide with a strong current flowing from the Black Sea into the Aegean Sea. The distance from the mouth at Cape Helles to the Sea of Marmara is just over 40 miles – and the straits are overlooked by the Gallipoli peninsula and the lower slopes on the Asiatic side of the straits. The widest point of the strait is around 4.5 miles in width.
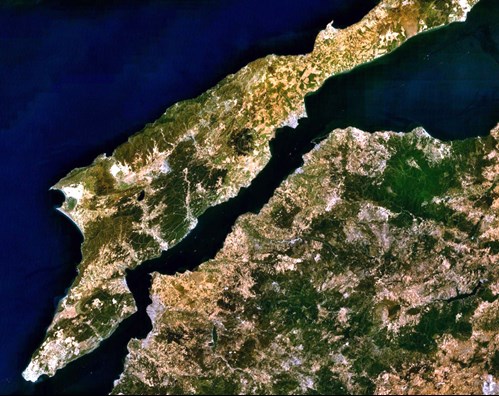
The narrowest section of the strait is from Chanak to Kilid Bahr – where the water is just 1,600 yards (less than a mile) from shore to shore. The straits turn north-east for the final 23 miles to the Sea of Marmara.
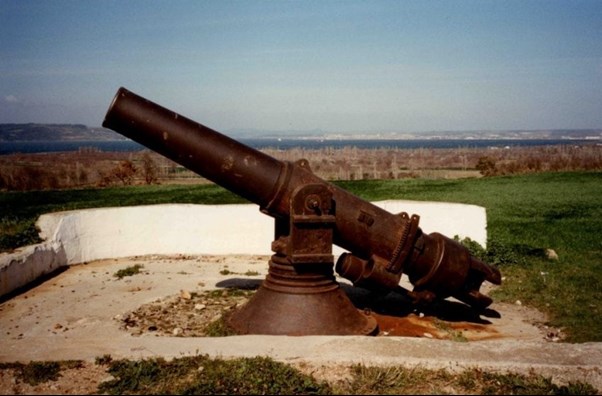
Until late October 1914, the nature of the seaward defences of the Dardanelles was known to the allies but after war broke out, information on improvements to the Turkish fortifications became harder to obtain.
First attempt
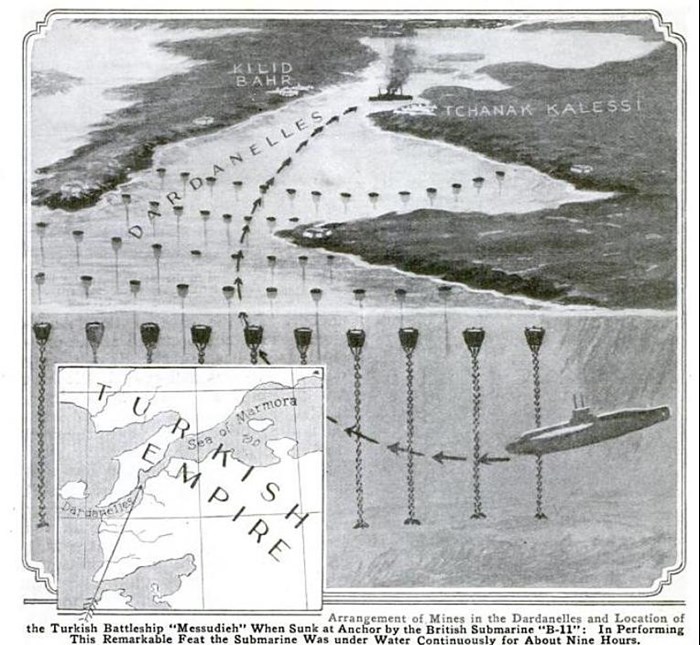
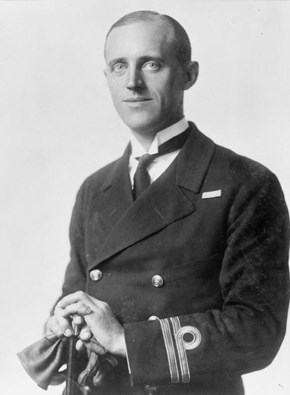
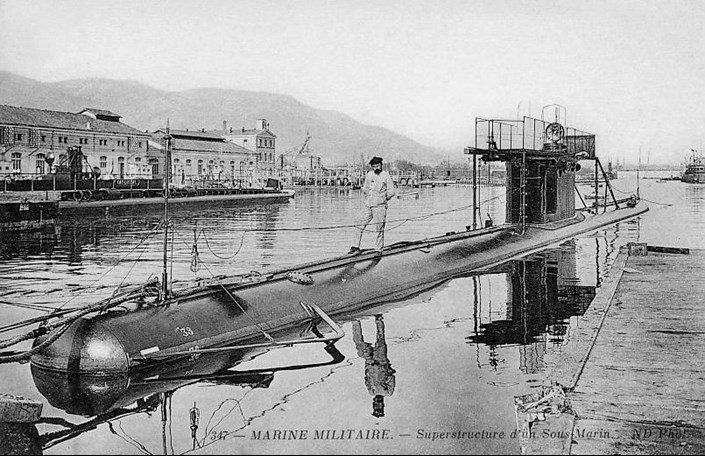
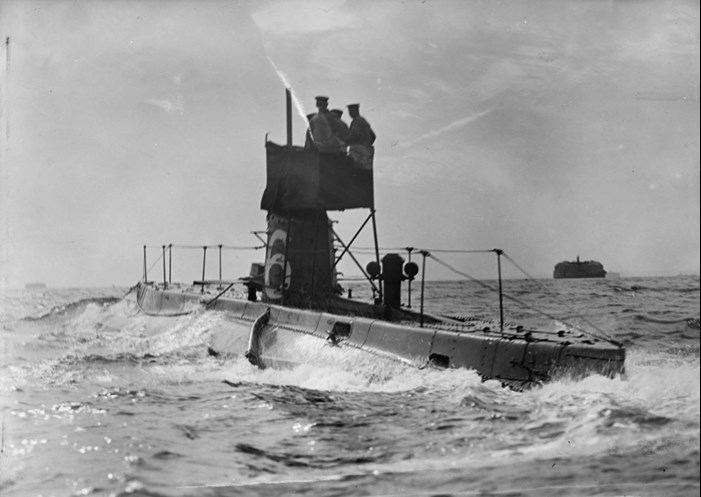
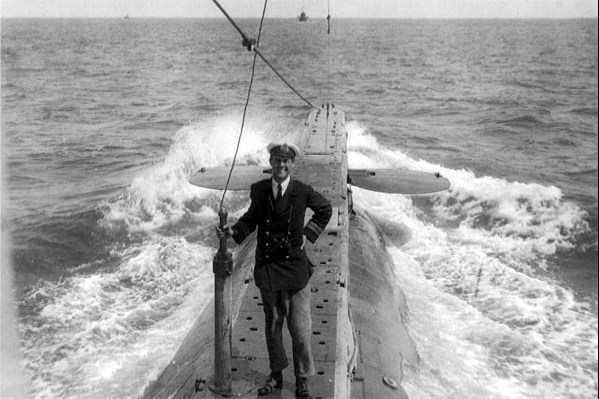
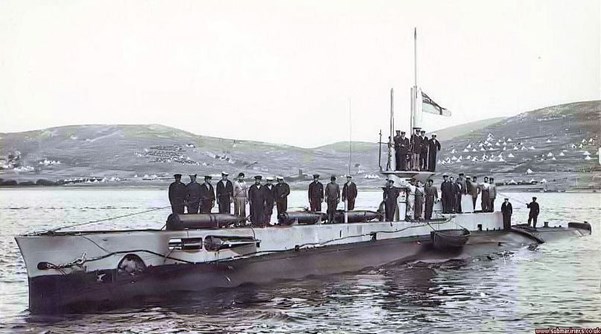
On 13 December 1914, British submarine B11, commanded by Lieutenant Norman Holbrook was tasked with entering the Dardanelles. The B11had been selected for the mission (despite being obsolete) because the boat had recently been fitted with a new battery.
B11 started its journey from Tenedos. On 13 December, B11 entered the Dardanelles, but before the submarine reached the first row of mines it was discovered that some damage had been sustained, meaning repairs had to be carried out. This done, the mission continued.
The B11 then had to pass under five rows of mines through then uncharted currents. Passing through the minefield took about five hours.
At around 11:30, B11 spotted the ancient Turkish battleship Mesûdiye at anchor (the warship was a 40 year old) and fired a single torpedo from a distance of 1½ miles. The torpedo hit the Mesûdiye’s stern which caused serious damage.
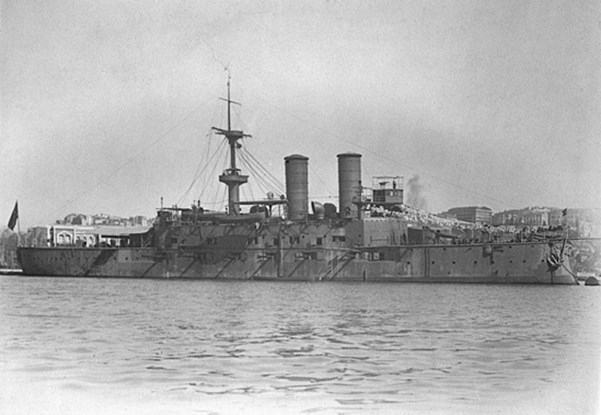
Despite being mortally damaged, Mesûdiye's guns briefly fired at B11's periscope. Mesûdiye capsized ten minutes after the torpedo struck, trapping many of the 673-man crew. Due to being hit whilst in shallow shoal water, the hull remained above the surface so most men were rescued. Casualties amongst Mesûdiye's crew were not heavy - only 10 officers and 27 men were killed.
Ironically, the attack was probably counter-productive in the long run, as a Turkish salvage team removed the 150mm and 76mm guns, which were subsequently used to strengthen the defences of the Dardanelles, the larger guns being installed as "Battery Mesûdiye" and helped in the sinking of the French battleship Bouvet on 18 March 1915.
In the meantime, B11 successfully returned to port. For this attack, Lt. Norman Holbrook was awarded the Victoria Cross, the first awarded for service in a submarine.[1]
The second in command, Sydney Winn, was awarded the Distinguished Service Order, and every crew member was awarded the Distinguished Service Medal. In 1916 the Prize court awarded the submarine's company prize money of £3500 for the sinking of Mesûdiye. Holbrook received the largest share of over £600, whilst Winn was handed over £480. The crewmen all received £120 each which was no doubt well received, being the equivalent of about three years' pay.
Development of Plans
Following the success of the B11’s mission, on 11 January 1915, the commander of the British Mediterranean Squadron, Vice Admiral Sir Sackville Carden put forward a plan for taking the operations further by forcing the Dardanelles straits using a number of battleships and minesweepers. The plan also called for the use of submarines.
The first French submarine operation took place soon after Carden’s plan was drafted.
On 15 January 1915, the French submarine Saphir passed the Narrows and managed to avoid the ten rows of mines but ran aground at Nagara Point.
Various theories as to why the submarine sank have been put forward, some saying the submarine was either mined or sunk by shellfire. Whatever happened, fourteen of her crew died and thirteen were taken prisoners of war.
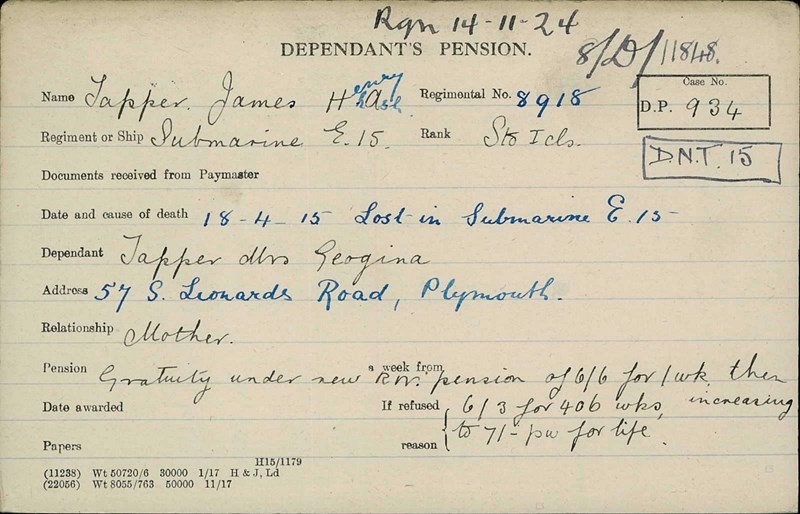
The Loss of the E15
On 17 April 1915, the British submarine HMS E15 (crewed by three officers and 28 men) attempted to pass the straits but having dived too deeply beneath the surface, was caught by a current and ran as a result ran aground near Kepez Point, beneath the guns of the Dardanos battery.
The boat’s commanding officer Lt-Commander Theodore Brodie was killed in the conning tower by shrapnel and six of the crew were killed by chlorine gas released when the submarine's batteries were exposed to seawater after Turkish shell fire pierced the hull.

A diary kept by Telegraphist May records:
'Everything going well until about 7am when we struck and, despite all that could be done, we were soon high and dry. The Turkish batteries then opened fire on us one large shell entering our conning tower and killing the captain as he was going on the bridge. Several shells came through the boat, one entering the engines and bursting several oil pipes, thick smoke began to come from aft, but we could not see what had happened there.
The men then began to go up the conning tower and through the shell hole and take to the water. The boat was about three-quarters of a mile from the shore and this distance we had to swim. Several men would not attempt it and I think it was because of this that so many were injured.'
Those killed, besides Lt-Commander Brodie, were Stoker 1st class James Tapper, Engine Room Artificer 2nd class Ernest Hindman and Able Seamen Arthur Housman, Frederick Gingell and Frederick Cornish.
The submarine’s commanding Officer Lieutenant Commander Theodore Stuart Brodie had a twin brother (Lieutenant Commander Charles G Brodie) who was also in the submarine service. These two officers were nicknamed 'Dummy Head' and 'War Head' respectively by their compatriots.
The grounding of the E15 was soon noticed by patrols of the Royal Naval Air Service, and this was rapidly reported to the SS Hindu Kush, the Allied submarines' HQ and depot ship.
It was considered vital that the E15 was destroyed to prevent the Turks from salvaging her and using her against the British and French fleet.
The first attempt was made by British submarine B6 which had on board Brodie’s brother Lt Commander Charles Brodie. The torpedo from B6 missed and the attempt failed.
Later, during the hours of darkness, two destroyers tried, but failed, to find the E6.
The following morning, another ‘B’ class submarine, the B11 made an attempt to locate E6, but once again failed due to fog that developed in the area.
Not deterred, two battleships were ordered to undertake the operation but were kept well away by Turkish batteries. A different approach was tried, using seaplanes, but again this did not work out.
Finally, on the night of 18 April, two small picket boats, (only about 50 feet in length) were sent in. One of these was from HMS Triumph, the other from HMS Majestic. The picket boats were armed with two 14-inch torpedoes.
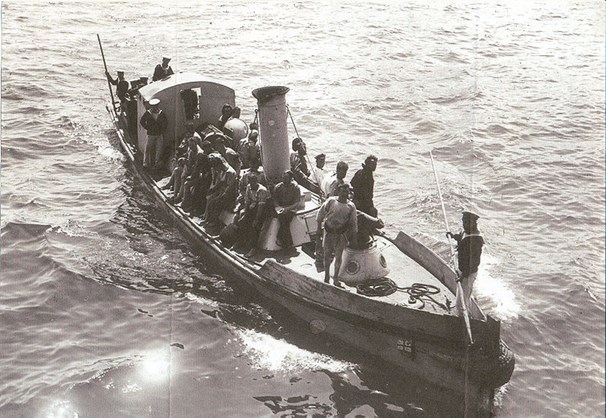
In charge of the operation was Lieutenant Commander Eric ‘Kipper’ Robinson, an officer from HMS Vengeance, who took charge from Triumph's picket boat. Despite being detected and lit up by searchlights, (which brought down a hail of fire from both shores) both boats were untouched.
Luckily, the Turks accidentally directed a searchlight which briefly illuminated the E15 and without delay, the picket boats attacked the abandoned British submarine. The Majestic’s boat, despite being blinded by the searchlights, fired a torpedo, but missed the E15. Moments later the picket boat was hit, mortally wounding one seaman.
The Majestic’s boat went in again and fired a second torpedo, which struck E15 just forward of the conning tower, but well below the waterline.
‘Kipper’ Robinson brought his boat alongside and rescued the men from the Majestic’s picket boat. Overloaded, Triumph's boat departed unobserved, the Turkish gunners concentrating their fire on the drifting and abandoned wreck of the damaged and abandoned picket boat sister ship.[2]
Death and Captivity
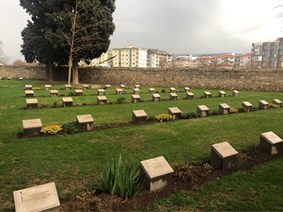
As mentioned above, Brodie, Cornish and Hindman were killed in the operation and are buried in the Turkish Consular Cemetery at Chanakale.
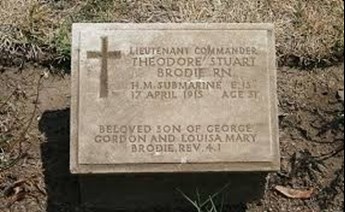
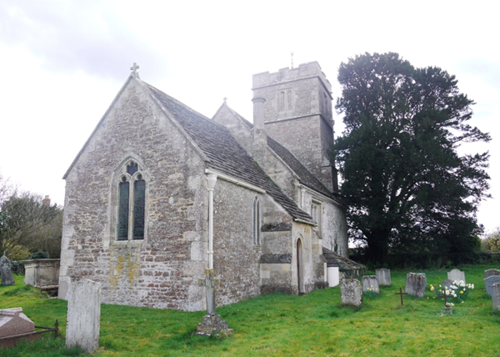
Brodie is commemorated atAll Saints Church, Tellisford.
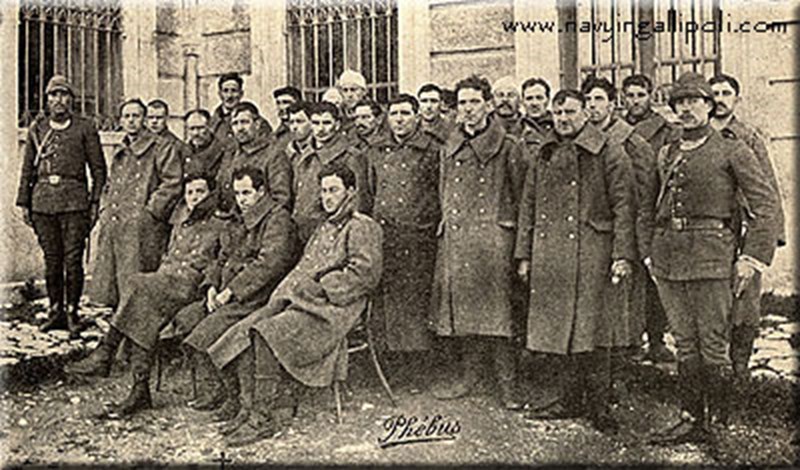
The remainder of the crew were captured, but not all survived – several died in captivity as Prisoners of War.
Successful Passage
When Carden made his plans back in January, he would have been aware that en-route to the Dardanelles was Australian Navy submarine AE2.[3]
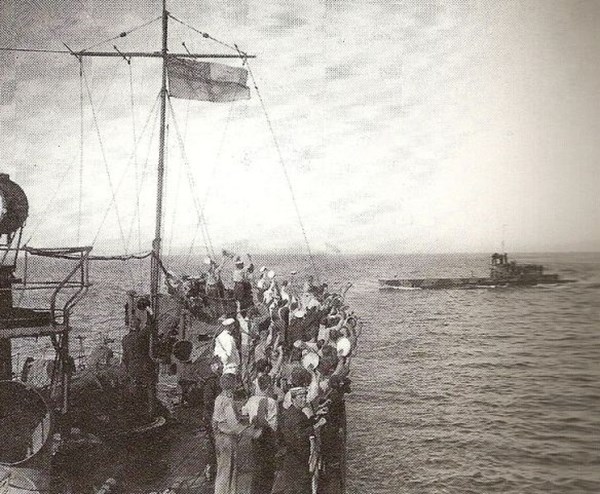
On the outbreak of the war both of Australia’s submarines were dispatched to New Britain (part of the ‘Islands Region’ of Papua New Guinea). One submarine (the AE1) was lost in an accident, but AE2 returned and, on 31 December 1914, left Australia with the second ANZAC convoy. The submarine was towed across the Indian Ocean and arrived in Gallipoli in early March 1915, under the command of Lieutenant Commander Henry Hugh Gordon Dacre Stoker.
After Brodie's failure in E15, Stoker requested to be allowed to try in AE2. The date for the landings was only weeks away and it was important to cause maximum disruption in the Turkish rear areas. This realistically could only be done by submarines.
The AE2's initial attempt on 23 April had to be abandoned due to faulty machinery. But on the evening of 24 April, Stoker in the AE2 was again given instructed to proceed by Admiral de Robeck who had taken over command after Vice-Admiral Carden fell ill.
Stoker was instructed to sink any minelayers he saw in the Narrows and, as the landings were due at dawn the next day, to 'generally run amok' around Çannakale and cause maximum disruption to the Turks. He described how he went about the attempt:
Having proceeded from the anchorage off Tenedos, I lay at the entrance off the Dardanelles until moonset and at about 2:30am on 25th April entered the straits at 8 knots. Weather calm and clear. As the order to run amok in the Narrows precluded all possibility of passing through unseen, I decided to travel on the surface as far as possible.
Searchlights swept the sea but the AE2 somehow avoided detection until 4:30am when gun batteries opened fire. Stoker dived the AE2 and started an underwater passage through the minefields. Wires tethering the mines repeatedly scraped along AE2 and Stoker had to come to the surface twice to check his position.
Approaching the narrows at 6:00am, forts on both sides of the Narrows sighted the submarine and opened heavy fire.
Later, Stoker sighted an enemy warship. His report described what happened next:
At a range of 300-400 yards I fired the bow torpedo, at the same moment ordering 70 feet in order to avoid a TBD [torpedo boat destroyer] which was attempting to ram on the port side. As the vessel descended the TBD passed overhead close, and the torpedo was heard to hit. As the cruiser, dead ahead, might be expected to sink almost immediately, I altered course a point to starboard to avoid becoming entangled with her. At the time I believed the vessel to be in the centre of the strait. About 4 minutes later I altered back to the original course, and ordered 20 feet. As the vessel was rising she hit bottom and slid up on the bank to a depth of 10 feet, at which depth a considerable portion of the conning tower was above water. Through the periscope I saw that the position was immediately under Fort Anatoli Medjidieh.
The guns in the Turkish fort opened up on the AE2. Luckily, the Turks were unable to depress their guns sufficiently to hit the boat and other batteries were too far away for accurate shooting. Stoker was able to refloat the sub and back into deeper water. Unfortunately, shortly after this, she again grounded. Stoker detailed this as follows:
As my vessel was lying with inclination down by the bows I went full speed ahead. Shortly afterwards she began to move down the bank, gave a slight bump, gathered way and then bumped very heavily. She, however, continued to descend and at 80 feet I dived off the bank. The last bump was calculated to considerably injure the vessel, and probably impaired the fighting efficiency, but as I considered my chief duty was to prove the passage through the Straits to be possible, I decided to continue on course.
During this time, AE2 directly assisted the landings on the peninsula, as a Turkish battleship, which had been firing from the Dardanelles across the peninsula at the invasion fleet, sighted the AE2’s periscope and immediately stopped its activities and quickly moved away.
Having escaped from the guns of the Turkish forts a second time, Stoker established his position as approaching Nagara Point. This is where the narrows widen significantly.
However the AE2 was not safe. She was surrounded by enemy vessels and each time Stoker showed AE2’s periscope Turkish destroyers tried to ram the boat. Stoker decided to take the submarine to the bottom and hope the enemy would disperse.
Throughout the rest of 25 April, AE2 was submerged in just 80 feet of water and enemy vessels searched on the surface.
Eventually, at around 9:00pm Stoker surfaced having been submerged for in excess of 16 hours. Thankfully no enemy vessels could be seen and Stoker recharged the submarine's batteries and to send a signal to the Commander-in-Chief notifying him of the successful passage through the ‘Narrows’.
At that moment Sir Ian Hamilton was in conference with his senior staff discussing the progress of the Allied troops ashore on board HMS Queen Elizabeth. Hamilton had just received a message from Lieutenant General William Birdwood who had suggested an evacuation of the ANZAC sector.
The message from AE2 was relayed to Queen Elizabeth at the critical moment when Hamilton was discussing with his staff whether or not to order an evacuation. The meeting was dramatically interrupted when Stoker’s signal arrived. Commodore Roger Keyes said:
“It is an omen. An Australian submarine has done the finest feat in submarine history and is going to torpedo all the ships bringing reinforcements, supplies and ammunition into Gallipoli.”
Hamilton made a decision and ordered a signal to be sent to the troops ashore:
“Your news is indeed serious. But there is nothing for it but to dig yourselves right in and stick it out. It would take at least two days to re-embark you, as Admiral Thursby will explain to you. Meanwhile, the Australian submarine has got up through the narrows and has torpedoed a gunboat…Hunter-Weston, despite his heavy losses, will be advancing tomorrow which should divert pressure from you. Make a personal appeal to your men…to make a supreme effort to hold their ground. P.S. You have got through the difficult business, now you have only to dig, dig, dig until you are safe.”
The timing of AE2’s signal may have influenced the decision made by Hamilton, resulting in the ANZAC forces remaining on the peninsula.
In the early hours of the following day, 26 April, AE2 sailed further up the Dardanelles en-route firing at (but missing) a Turkish warship, that evaded the subs torpedo.
Stoker entered the Sea of Marmora by 9am but had used two of the eight torpedoes on board so decided he had to be very selective in terms of what he attacked – deciding troop transport ships were the main priority.
Over the next three days a further three attacks were made by Stoker. One torpedo failed to leave the tubes, and the other two missed their target. But he was making a nuisance of himself and on each occasion the Turkish ships attempted, but failed, to ram him.
On 29 April he undertook a deception operation when he:
[showed the sub’s] periscope to give the impression that another submarine had come through. TBDs and TBs [torpedo boats] came out in pursuit, and having led them all up towards Sea of Marmora, I dived back …but found nothing to attack
Later in the afternoon of the 29th, he rendezvoused with HMS E14 (see below) which was the second Allied submarine to successfully pass through the Dardanelles narrows. The two boats met at 5:00pm off Kara Burnu Point and following a discussion between the two commanders, a subsequent rendezvous was agreed for 10:00am the next day.
Arriving on 30 April at the rendezvous point, Stoker immediately saw a Turkish warship. He described the attack with him trying to dive beneath the surface, but the AE2 failed to remain underwater and was seen. He describes, in a report, the result of this:
Within a few seconds the engine room was hit, and holed in three places. Owing to the great inclination down by the bow, it was impossible to see the TB through the periscope and I considered that any attempt to ram would be useless. I therefore blew main ballast and ordered all hands on deck. Assisted by Lieutenant Haggard, I then opened the tanks to flood and went on deck. The boat sank in a few minutes in about 55 fathoms, in approximate position 4 degrees north of Kara Burnu Point at 10:45am.
Stoker had, as the crew were abandoning the boat, destroyed papers and charts. The crew were picked up from the water and no lives were lost. However four crew died in captivity.
One of the crew that died in captivity was Petty Officer Stephen Gilbert who was forced to work during the winter of 1915 to 1916, in Belemedik (in the Taurus Mountains), on the Berlin to Baghdad railway line. In the summer of 1916, malaria and typhoid broke out in the prisoners’ camp and Gilbert died of malaria on 26 September 1916. He was buried in the local Christian cemetery but, after the war his body was disinterred by the Imperial War Graves Commission and reburied in the Baghdad (North Gate) War Cemetery.
After his capture, Stoker was a prisoner of war for more than 3 years. He was awarded the Distinguished Service Order for his actions in AE2.
The Second Successful Passage and French failure
The second allied submarine that made it through the straits was HMS E14. This boat had more luck than AE2. On 27 April, the submarine’s commander, Lieutenant-Commander Edward Boyle, sailed through the narrows and entered the Sea of Marmara.
He then embarked on a three-week voyage that was highly successful. Whilst the number of ships sunk was quite small, the effect on Turkish communications (and indeed morale) was immense. On returning to the fleet, Boyle was awarded the Victoria Cross. His citation read as follows
For most conspicuous bravery, in command of Submarine E14, when he dived his vessel under the enemy minefields and entered the Sea of Marmora on the 27th April, 1915. In spite of great navigational difficulties from strong currents, of the continual neighbourhood of hostile patrols, and of the hourly danger of attack from the enemy, he continued to operate in the narrow waters of the Straits and succeeded in sinking two Turkish gunboats and one large military transport.
The large transport mentioned in the citation that Boyle sank was the Gul Djemal.
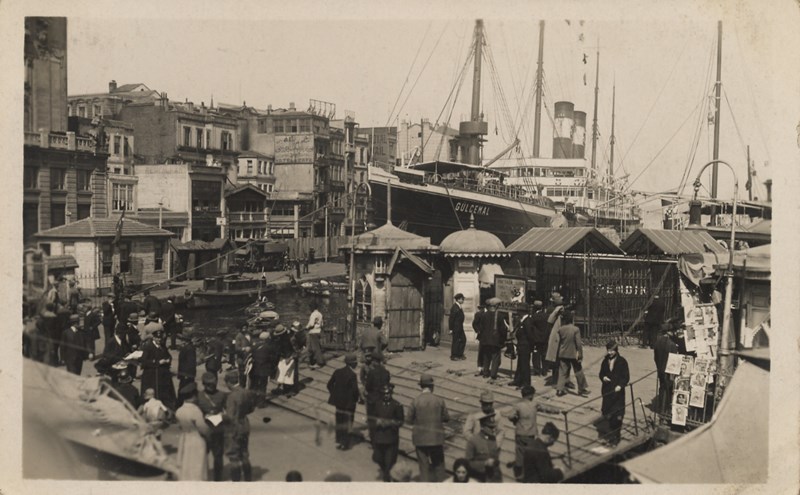
On 3 May 1915, Gul Djemal was transporting 1,600 soldiers, when she was torpedoed by HMS E14. Although the Turkish transport was damaged she did not sink, and returned to Istanbul. British sources incorrectly claimed that the ship was sunk with great loss of life.
Boyle and E14 made a number of subsequent sorties into the Sea of Marmara.
Following the success of AE2 and E14, the French submarine service attempted to emulate the Royal Navy and enter the Sea of Marmara. The French submarine Joule tried on 1 May, but the submarine struck a mine and was lost. There were no survivors.
The most successful submarine?
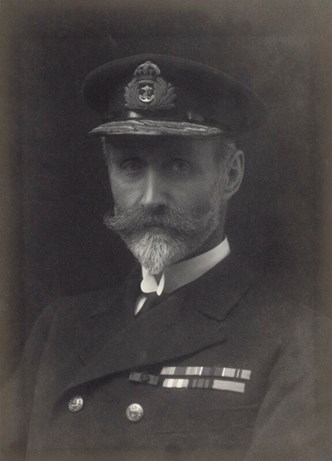
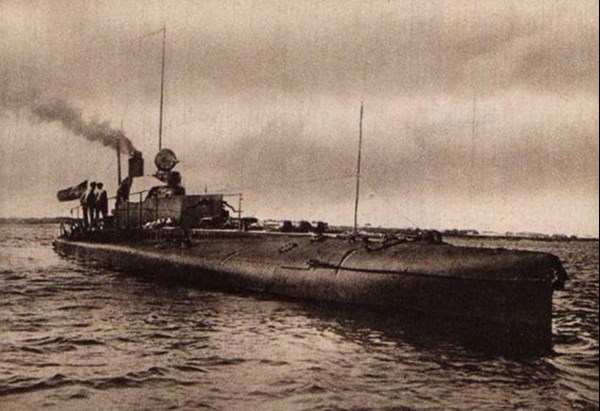
After the successful mission of Boyle in E14, the sister ship of this boat, HMS E11, was the next British submarine to undertake a successful tour of the Sea of Marmara. The E11 entered the Dardanelles on 18 May.

Off the town of Gallipoli (which is at the top of the Dardanelles, and the western end of the Sea of Marmora) the submarine’s commanding officer, Martin Nasmith captured a Turkish sailing vessel. Coming up with the innovative idea of using this as ‘cover’ he lashed it to the E11’s conning tower. However, this did not work as he was unable to locate suitable targets, so after a few days he abandoned the plan.
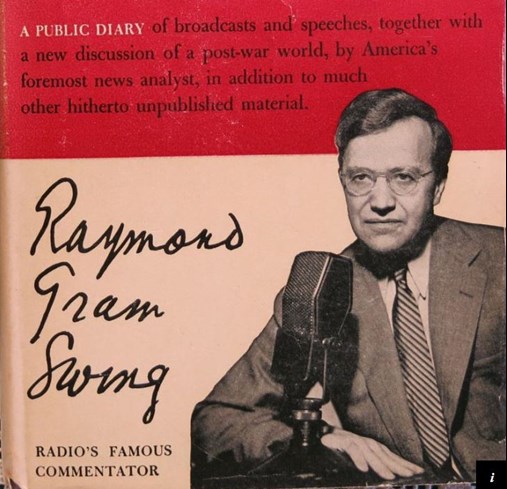
E11 soon sank a gunboat and several other small craft. The following day, 24 May, near the port of Rodosto, E11 came across the transport Nagara, which - although not carrying troops - was full of ammunition. On board the Turkish vessel was an American journalist, Raymond Swing.
As E11 drew close to the Nagara, Nasmith came to the conning tower, wearing a white sweater, and called to the Turkish ship.
'Who are you?' he shouted. Turkish sailors panicked and started to jump into the sea.
Swing should have replied with the ship's name but he instead responded "I'm Swing of the Chicago Daily News".
Nasmith sank the Nagara and went on – in the same day - to sink another transport and forced another one aground.
Within twenty-four hours E11 reached Constantinople. Nasmith was hoping to locate the German warships SMS Goeben and SMS Breslau, but when he surfaced his eyes fell on a cargo ship called the Stamboul which was alongside the Tophane Arsenal.
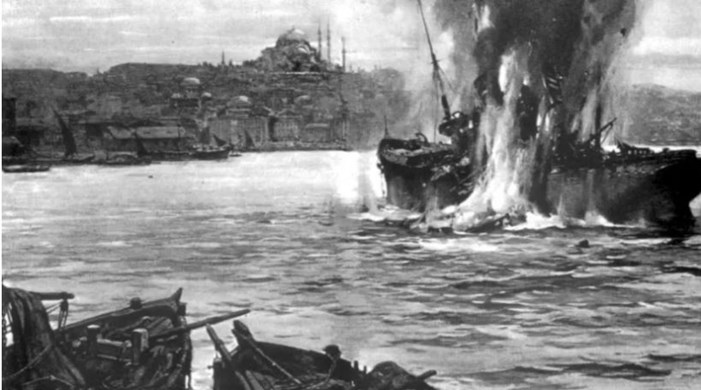
It was too tempting a target to not take advantage of. Nasmith fired a torpedo but this ran in a circle and nearly came back to hit the E11. Firing a second torpedo he hit Stamboul. E11 dived to escape but was caught in the strong current, and was effectively out of control for 20 minutes. Eventually she came to rest on the sea bed of the vast Constantinople harbour. Nasmith’s attack on the city, the first in over 100 years, caused panic and had a devastating impact on Turkish morale.
Later, during Nasmith’s patrol and despite not having a gun fitted to the submarine, he attacked Turkish cavalry and other troops on the Gallipoli coast road: his crew firing their rifles from the surfaced submarine. It is possible this submarine versus cavalry action is unique in the history of warfare.
E11 returned to the city on 27 May and sank more ships, but Nasmith had by now depleted his supply of torpedoes. The submarine was also in need of repair so he started the return journey.
En-route through the Dardanelles he came across a further transport vessel which he attacked and sank with his final two torpedoes. The danger was not over, as – whilst passing through the Narrows - E11 snagged a moored mine. Nasmith had to tow the mine out of the straits before he was able to disentangle the submarine. On this – the E11's first sortie - eleven enemy ships were sunk or disabled. For this Nasmith was awarded the Victoria Cross, becoming the third submarine commander to receive the award during the Gallipoli Campaign.
Nasmith and E11 were to undertake another successful patrol in August.
On this sortie she damaged a cruiser, sank the pre-dreadnought battleship Barbaros Hayreddin on 8 August (during the Suvla landings) and then went on to pay a return visit to Constantinople. In the harbour, she sank a transport that was bringing much needed coal to the city.
When the coal-carrying ship came into sight of the docks, a welcoming committee of municipal grandees soon formed, along with a happy crowd – water, electricity and rail transport had all suffered due to a lack of coal. Hardly had the ship berthed than it mysteriously blew up before the eyes of the astounded crowd. Nasmith successfully slipped out again.
On the night of 20 August, E11's first officer, Lieutenant Guy D'Oyly-Hughes, swam ashore in the Gulf of Izmit (at the easternmost edge of the Sea of Marmara) and blew up a section of the Constantinople–Baghdad railway line.
For this he was awarded the Distinguished Service Cross.
HM Submarine E2
In August 1915 Lt-Commander David de Beauvoir Stocks took E2 through the Dardanelles to support E14. Whilst dived to pass the net off Nagara, E2’s gun mounting became fouled by a 3.5 inch anti-submarine wire. Manoeuvering to free the boat, small explosions could be heard. These were actually small bombs which were being thrown over the side of a guard boat. Subsequently, louder explosions were heard, these being shells fired from a destroyer. Commander Stocks managed to free the boat and she successfully passed through the Dardanelles.

On 14 August 1915, E2 sank Turkish minelayer Samsun with her two officers and eight crew.
During August E2 and E11 worked together, attacking coastal traffic. On 22 August they bombarded the magazine and railway station at Mudanya (which is at the eastern end of the Sea of Marmara. On the same day E2 attacked and sank a large steamer off Mudanya pier.
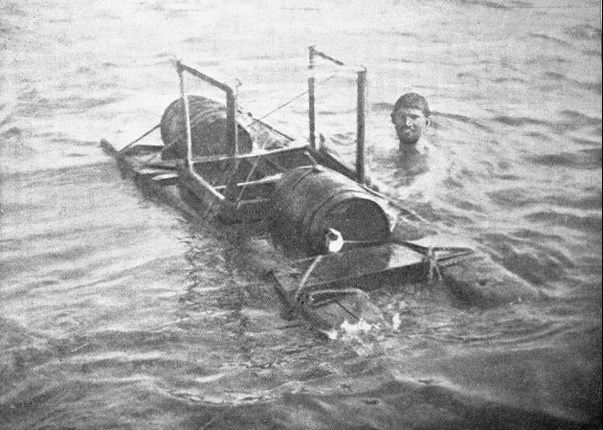
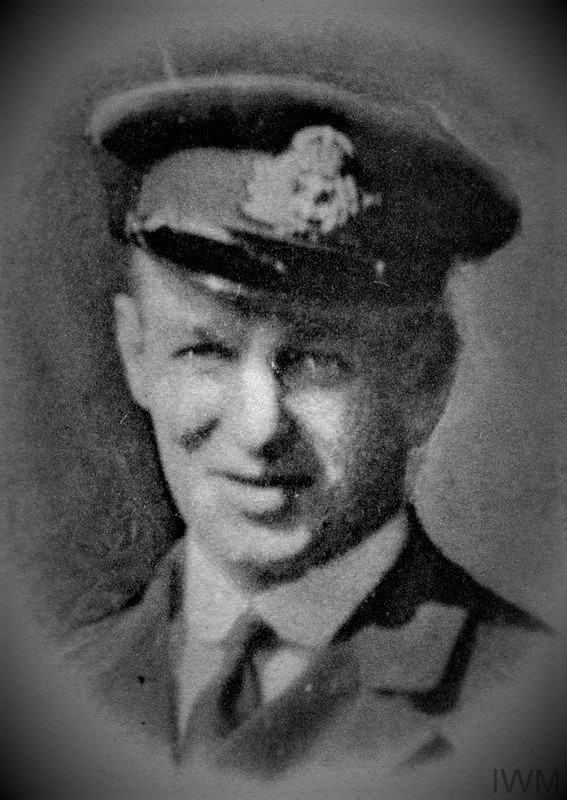
Two weeks later, on September 7th, E2’s Lt Harold Lyon swam with explosives to two dhows and destroyed both. The next day – 8 September – he again swam from the boat with a bag of gun cotton on a raft. His objective was to destroy a railway bridge near Küçükçekmece.
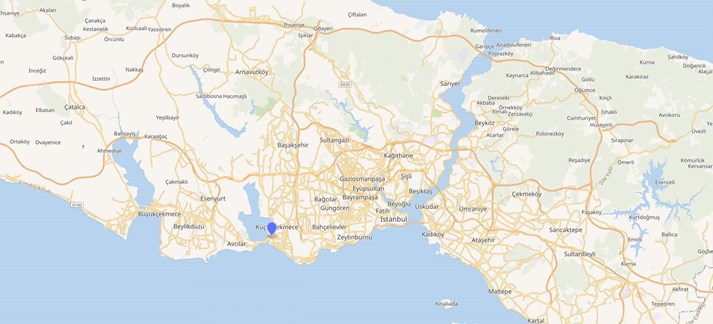
This was likely a vital component in the Istanbul to Gallipoli train line.
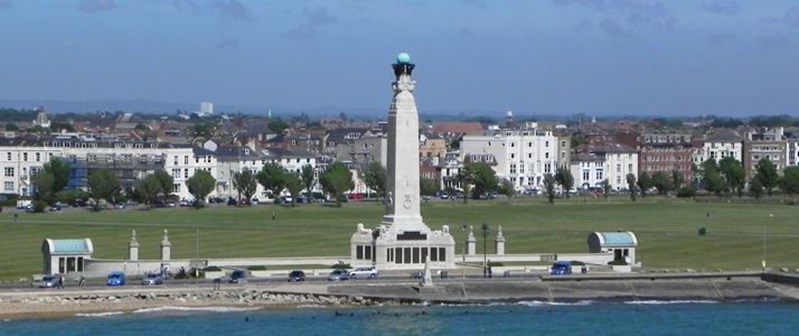
The bridge was destroyed but Lyon failed to return. E2 waited five hours but nothing was seen or heard of Lt Lyon. In the hope that he would turn up, Lt-Commander Stocks remained in the area for two days but Lt Lyon was never seen again. Lt Lyon is commemorated on the Portsmouth Naval Memorial.
Conclusion
Of the six VCs awarded to the Submarine Service in the First World War, three were awarded in the Gallipoli campaign (Holbrook in B11, Nasmith in E11 and Boyle in E14).
The Royal Naval submarine campaign in the Sea of Marmara was arguably the one significant success of the Gallipoli campaign. In undertaking these missions, the navy forced the Turks to abandon the oversea transport route to Gallipoli. Between April and December 1915, nine British and four French submarines sank one battleship, one destroyer, five gunboats, eleven troop transports, forty-four supply ships and 148 sailing vessels at a cost of eight Allied submarines.
References
[1] Norman Holbrook died in 1976 at and was buried at St James Old Churchyard, Stedham, West Sussex. He is likely to be the only VC recipient to have a town named for him. In August 1915, amid a surge of anti-German feeling the name of a town in the New South Wales was changed from ‘Germanton’ to Holbrook in honour of the submarine commander. After the war he visited the town on three occasions. A statue of Norman Holbrook VC stands in Germanton Park, Holbrook, NSW to this day.
[2] ‘Kipper’ Robinson was a good friend of Roger Keyes from their days in China together, he led a raid on a Turkish mobile battery based at the foot of Achilles Mound (reputed to be the burial ground of the Greek Hero from the Trojan Wars) in February 1915. He was dressed in Navy whites and, under a hail of machine gun fire was described as ‘looking like a sparrow bathing under a hose-pipe’. It was for this he was awarded the VC and his actions in attempting to recover were perhaps somewhat overlooked as the VC was still under consideration, many of those involved were decorated. He also distinguished himself in the Caspian Sea commanding Motor Torpedo Boats during the Russian Civil War.
German Diver Ernest Roshmann was working on salvaging the E15 when the attack took place and witnessed the whole event, he described Robinsons actions as ‘I have never in the course of the war seen an attack carried out with such pluck and fearlessness’
Keyes evaluation of Robinson was very honest - “I am honestly lost in admiration for Robinson, he has done splendidly and I honestly am surprised. I did not think much of him as a First Lieutenant. But that evidently does not prevent him being an exceedingly brave man.”
[3] AE2, and its sister ship AE1, were the first submarines allocated to the Royal Australian Navy.
Becoming a member of The Western Front Association (WFA) offers a wealth of resources and opportunities for those passionate about the history of the First World War. Here's just three of the benefits we offer:
This magazine provides updates on WW1 related news, WFA activities and events.
Access online tours of significant WWI sites, providing immense learning experience.
Listen to over 300 episodes of the "Mentioned in Dispatches" podcast.
Other Articles


