


The Battle of Cambrai in November 1917 turned out, for both Britain and Germany, to be a major signpost showing how to break the trench deadlock of the previous three years. The lessons of the operational successes and failures would be digested by both sides over the forthcoming winter. For the British, especially, the battle failed to live up to the initial expectations but lessons were learned by both sides. Although the Germans would apply what they had learned first, it was to be the British who were to be the more successful at putting the new developments into practice.
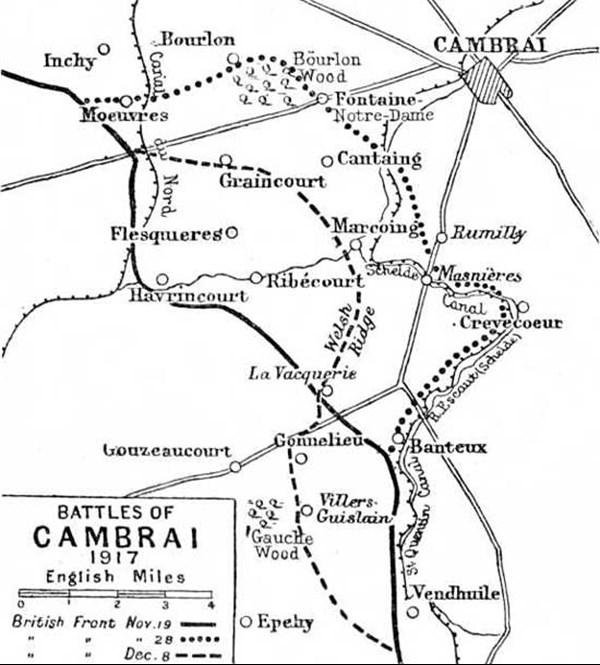
The Battle of Cambrai - general area (Map image courtesy Probert Encyclopedia)
Cambrai was to give the British GHQ food for thought over the winter. Clearly they had to understand what had gone right but, perhaps, more importantly, what had gone wrong. The reasons for the failure to achieve everything that was hoped for may have started at the planning stage.
The plan for the battle came about as a result of an idea initially put forward by Lt-Col JFC Fuller, GSO1 of the Tank Corps. He initially devised an Anglo-French attack supported by tanks, to capture St Quentin. This evolved into the operation at Cambrai.
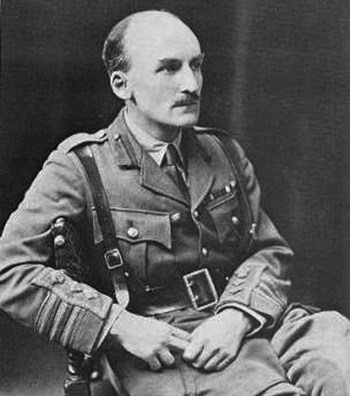
Above: Lt-Col JFC Fuller
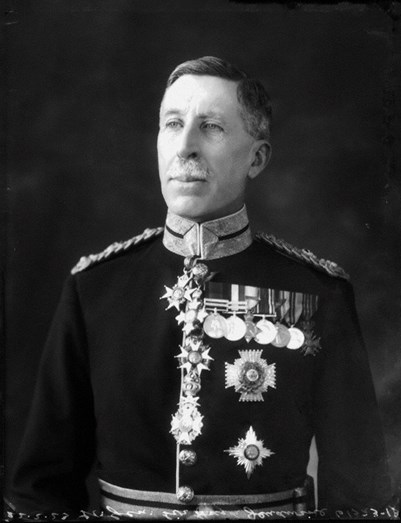
Above: Brigadier General Sir Hugh Elles

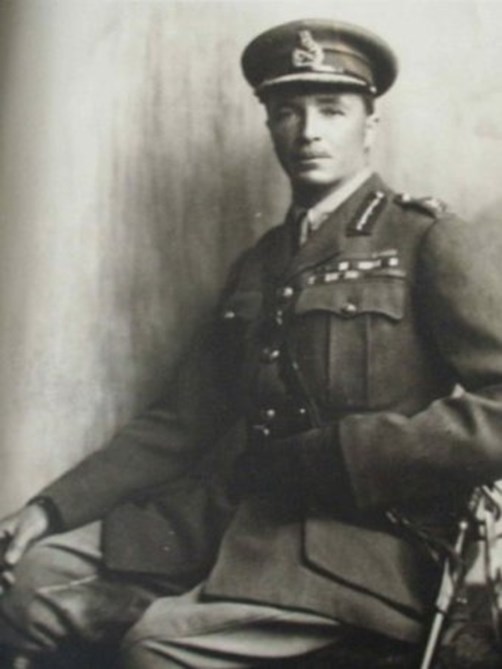
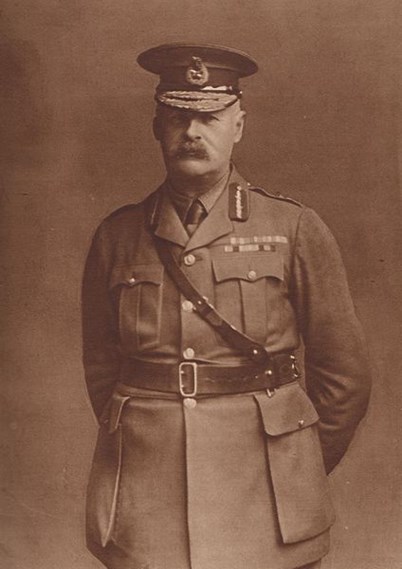
Above: General Julian Byng
Above: Brig-Gen H H Tudor
Brig-Gen H Elles, commanding the Tank Corps, took the plan to both GHQ and to General Byng, the new Third Army commander. Byng, coincidentally, had been ordered to prepare a diversion for Third Ypres - more usually known as Passchendaele - (this diversion to be aimed at the Flesquieres Ridge [1]) and Fuller’s plan, which arrived with Byng during the first week in August, fitted in with this order very well.
Independently of Fuller, Brig-Gen H H ‘Owen’ Tudor, CRA 9th (Scottish) Division had drawn up a plan for a trench raid, which would be launched without any preliminary bombardment, using tanks to cut the German barbed wire. Tudor envisaged the artillery shooting from the map – a technique that had never been tried before.
Tudor’s plan relied upon a predicted barrage. This was a technique whereby the known variables in a gun’s shooting, such as atmospheric conditions and barrel wear, were taken into account thus allowing an artillery piece to start its barrage without giving away its intentions by having to first register on its target.
The Tudor plan for the trench raid went via IV Corps to Byng on 23 August.
Byng perceived the combined plan as a great opportunity for the cavalry, once the German lines had been breached. Whilst combining the two plans was a brilliant combination of two independently conceived ideas, by introducing the cavalry – a tool of potential exploitation – he was sowing the seeds of the plan’s destruction.
Other factors now started to affect Byng’s plan. Although the two ideas had reached Byng by the end of August, the operation did not achieve final approval from GHQ until October. This alone was to undermine probably the main strategic reason for Cambrai going ahead: if it was to be a diversion for Third Ypres, it was necessary for the attack to be launched before Third Ypres was wound down. Additionally, the Italian defeat at Caporetto on 24 October was to have a most serious affect on the plan. Lloyd George, in his eagerness to have the Third Ypres offensive closed off, insisted on British divisions being sent to reinforce Italy; this diverted troops who could have been utilised as reserves at Cambrai.
Haig, probably concerned about Lloyd George’s attitude to further attritional battles in 1917, put a 48-hour time limit on the operation. If the objectives could not be gained, the battle would be shut down. To a certain extent this fits in more with the concept of a large raid rather than the breakthrough that was catered for in the orders. Kiggell, tellingly, is reported [2] as stating that Cambrai “was too good a scheme not to be given a chance of exploitation”. Interestingly, Charteris commented [3] that this was the first time ‘Intelligence’ had had to hold ‘Operations’ back.
The whole planning for Cambrai, undertaken at a leisurely pace between August and 20 November, seems to have been riven with contradictions. In the words of Woollcombe, [4] there was “total strategic vagueness” in the planning, which can only have undermined the operation, both in its planning and execution; nevertheless the operational plan was sound.
Although the planning was muddled, the operation itself relied upon secrecy, surprise and speed of execution. [5] These factors had rarely been achieved on the Western Front but, when they had, spectacular success had been within touching distance: Aubers Ridge in 1915 and Messines in June 1917 being the examples of what could be achieved in such circumstances.
The surprise was to be achieved through there being no preliminary bombardment. This was possible due to advances made in sound ranging [6] and flash spotting, and through the use of the predicted barrage mentioned earlier. The barrage was to fall on German artillery batteries instead of the barbed wire entanglements; the crushing of the wire was left to the tanks and this assisted both the tanks and infantry in that the battlefield did not turn into a morass of overlapping shell craters. The artillery concentration in terms of guns per yard was nearly equal to that achieved at the opening of Third Ypres [7] but the barrage was not now the standard “creeping” barrage, but an old-style “lifting” barrage. This may have led to more German artillery surviving than would have been the case had the creeping barrage been adopted. [8]
Whilst this was not the first time tanks had been used to crush the wire, it was the first time they had been used on their own without any assistance from the artillery. The Tank Corps was busy with other innovations: they developed a method for crossing the wide Hindenburg Line trenches by using large fascines of brushwood, which were dropped into the trenches by the tanks; and some tanks had grapnels for dragging the barbed wire to one side. Certain tanks had wireless sets on board in an effort to overcome the ever-present communication problem; there was even a tank that was tasked with cable laying. This was to a certain degree ironic because communication problems arose as usual in this battle through telephone wires being cut. It is recorded that the tanks themselves were probably the culprits on occasions in this battle. Supply tanks, dragging sledges, were also utilised – they did the work of whole companies of pioneers in the back breaking and dangerous task of bringing forward supplies to the attacking troops. A total of 476 machines were used. [9]
Innovative use was made of the Royal Flying Corps in the build up to the battle: low flying aircraft were sent over the German lines in order to mask the sound of the tanks’ approach. Co-operation also took place once the battle commenced; the RFC, at great cost, undertook low level attacks on German batteries and machine gun emplacements. In addition they ensured local air superiority.
Although the misty weather at the start of the battle was an advantage to the tanks, whose approach could not be seen clearly by the Germans, the mist was not such an advantage for the RFC as it seriously interfered with their air reconnaissance. This factor was to exacerbate the problems encountered at Flesquieres. During the battle, the Germans regained an element of equality in the air with the arrival of von Richthofen’s ‘circus’.
In order to achieve maximum assistance from the Tank Corps, the infantry insisted upon all possible tanks being used to support the initial attack. [10] Whilst this no doubt assisted the initial infantry waves, it meant that there was no specific tank reserve available for subsequent operations.
The Tank Corps had to achieve a high standard of co-operation with the infantry. Whether by design or accident, of the six divisions used on the main front in the initial assault, half had not been involved in Third Ypres (62nd, 6th, 12th). The success or otherwise of individual divisions does not seem to be directly related to whether or not they had been through Third Ypres. The traditional view of infantry success relates to the level of co-operation divisions attained with the tanks and it is on this issue that a great deal of controversy has arisen, particularly surrounding the 51st (Highland) Division’s tactics. It is this division’s commander, Maj-Gen Harper, and his alleged inability or unwillingness to work with tanks, leading to the Highlanders’ failure to take Flesquieres on the first day, that has been put forward as the cause for the lack of success at Cambrai. [11]

Above: 'Uncle' Harper - GOC 51st (Highland) Division

Above: Maj-General Walter Braithwaite 1915. He was GOC 62nd (West Riding) Division in 1917
One of the main principles behind infantry / tank co-operation is the mutual support each can give the other. This support depends upon the infantry keeping close to the tanks. Both Hussey and Hammond have identified that Harper’s tactics were not unique.[12] It appears that the infantry / tank tactics used by IV Corps (51st and 62nd Divisions) were different from those adopted by III Corps, and therefore criticism by authors Baker-Carr, Fuller and Liddell Hart, which has been followed by more recent authors, is unjustified.[13] Clearly, these authors are incorrect when they accuse Harper of being alone in his tactics, when in fact ‘his’ tactics were also used by the successful 62nd (West Riding) Division. It must therefore be wrong to state the failure of Harper’s Highlanders was purely down to their ‘unique’ tactics.
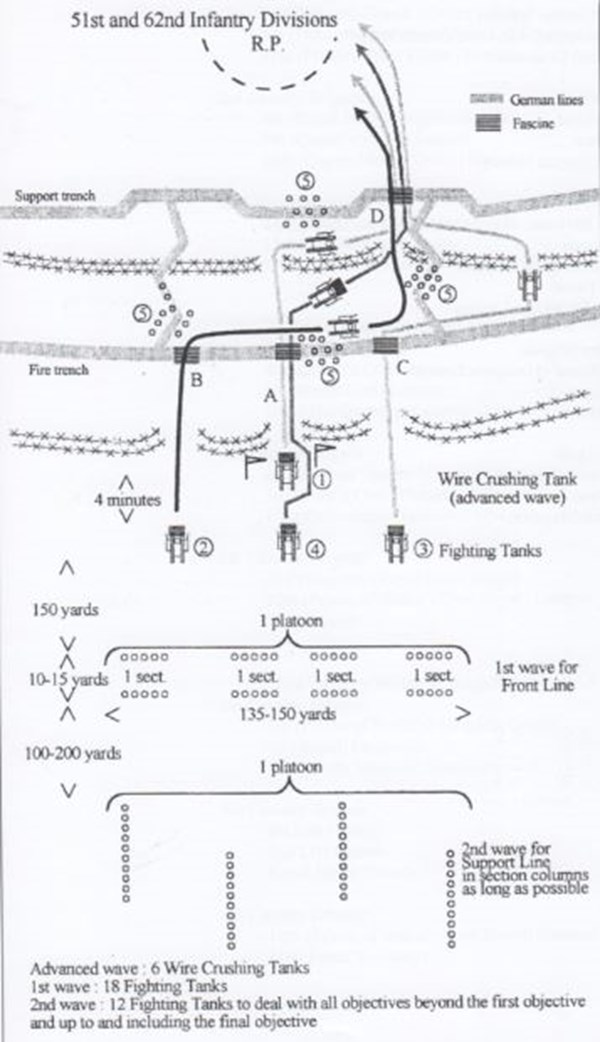
These two divisions employed an extra tank designated as a 'Wire Crushing' tank.
i) 'Wire Crushing' tank (number 1) breaks wire, creates gap and plants flags at "A" (in order to show the location of the gap to the following troops).
Tank moves on and drops fascine into fire trench, crosses the fire trench and proceeds to break the wire at the second belt.
Tank then swings right and once tank 4 has dropped fascine in support trench (at point "D"), crosses this support trench and proceeds to rallying point.
ii) Left flanking tank (number 2) breaks wire, drops fascine in fire trench at "B", crosses this fire trench and swings right, shooting along the trench.
Tank then crosses support trench at "D" and proceeds to rallying point.
iii) Right flanking tank (number 3) breaks wire, drops fascine in fire trench at "C", crosses this fire trench and swings right, shooting along the trench.
Tank then crosses support trench at "D" and proceeds to rallying point.
iv) The last tank (number 4) crosses fire trench at "A" following path of tank number 1, drops its fascine in the support trench, enabling other tanks to follow and proceeds to rallying point
(Infantry parties block trenches at various points (numbered "5")
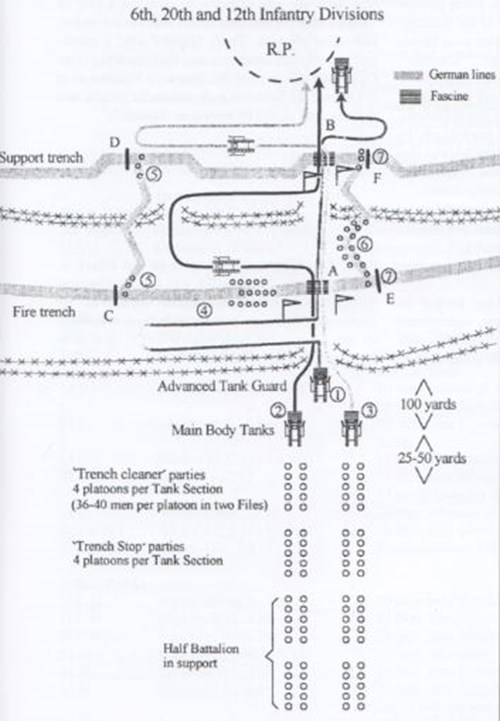
i) 'Advance Guard' tank (number 1) breaks wire, creates gap and swings left to rake fire trench.
Tank then follows other tanks to cross fire trench at "A" and support trench at "B", proceeding to rallying point
ii) Left 'Main Body' tank (number 2) plants flags at "A" (in order to show the following tanks the location of the fascine), drops the fascine in the fire trench, crosses the trench swings left to rake (for second time) the fire trench
Tank then breaks second belt of wire and rakes the support trench and follows other tanks to cross the support trench at "B", proceeding to rallying point
iii) Right 'Main Body' tank (number 3) crosses fire trench at "A", breaks the second belt of wire, plants flags at support trench at "B", drops the fascine in this trench and crosses it.
Tank then turns left to rake the support trench before proceeding to rallying point.
(Infantry parties block trenches at C, D, E and F)
Credit source for the above plans: “Following the Tanks. Cambrai. 20th November – 7th December 1917.” Jean-Luc Gibot and Philippe Gorczynski. English translation by Wendy McAdam. Arras 1999.
As both the 51st (Highland) Division and the 62nd (West Riding) Division used the same tactics, the failure of the Highlanders at Flesquieres must have been for some other reason. It would seem that they were unlucky in coming across a German artillery unit (108th Field Artillery Regiment) that had been specifically trained in anti-tank warfare. Whilst this artillery unit’s success has been placed at the door of a single German officer, authors Woollcombe, Hammond and Hussey suggest it was the unit (reinforced by the 213th Field Artillery Regiment) that knocked out a number of British tanks (16 is the number commonly put forward). Because the German artillery was capable of destroying tanks at a range of 500 metres, it would seem that no amount of infantry / tank co-operation (whether the infantry were close to the tanks or some distance away) would successfully combine to overcome these German batteries. Perhaps a more accurate or more concentrated barrage would have suppressed or destroyed the Germans guns sufficiently to make any issue about the Highlanders’ tactics irrelevant.
Not only did the Germans here have the advantage of a reinforced artillery unit trained in anti-tank tactics but also the terrain was in their favour, their emplacements being on a reverse slope; additionally no-man’s-land here was particularly wide.
The ability to control a fluid situation that was achieved in the ‘100 days’ had not yet been learnt; as a result, the Germans at Flesquieres were not attacked in the flank, although Braithwaite, GOC of the 62nd (West Riding) Division, did offer to make such an attack. In the event, a brigade of the 6th Division was ordered to make a flank attack; this flank attack unfortunately did not develop due to the over-cautious approach of the brigade commander concerned.
Another possible reason for the failure to take Flesquieres on the first day was the fact that IV Corps did not have the benefit of a third division. Hussey suggests that had the division on the Highlanders’ right, the 6th Division, been under IV Corps’ control, a more sensible approach to the capture of Flesquieres may have evolved. Hussey makes the point that had the 62nd Division and the 6th Division, on either side of the Highlanders, been tasked to pinch out Flesquieres from the flanks, much of the problems of a frontal attack would have been avoided.
The hold up at Flesquieres had a direct effect on the taking of Bourlon Ridge. Bourlon was to be taken by the 1st Cavalry Division, which had been detached from the Cavalry Corps, and was to pass through the positions taken by the 51st and 62nd Divisions.
Haig had identified the Bourlon position as the key ground in the entire operation. If taken, he believed that the whole of the German trench lines to the north would be compromised and a withdrawal may have to be made by the Germans. The 62nd Division’s orders were to take Bourlon if it was not already in the hands of the 1st Cavalry Division. Clearly Bourlon is a long way from the start line, and simplistically the best troops for covering long distances are cavalry. However, mounted troops are more vulnerable than infantry, and I would suggest that, with hindsight, the biggest operational error at Cambrai was tasking the cavalry with the taking of Bourlon on the first day.
It has already been noted that there was a significant lack of reserves available to Byng but, not far away to the east, the 29th Division was undertaking an operation which it may have been better to undertake at Bourlon. The 29th Division was ordered to pass between the 6th and 20th Divisions in order to secure the route for the Cavalry Corps and in particular take the bridges over the St Quentin Canal. Had the plan not become one of cavalry exploitation, it would have been a more effective use of the 29th Division to undertake the capture of Bourlon. 62nd Division’s 186 Brigade had leap-frogged through the rest of the 62nd Division but was incapable of advancing further than the sugar factory on the main Bapaume – Cambrai road. A fresh body of unmounted troops who, because they were unmounted, could pass across trenches and barbed wire, would surely have been able to inject impetus back into the attack (daylight permitting) and secure Bourlon Wood and village and, therefore, the entire ridge.
In terms of the actual operation, 1st Cavalry Division, although under the orders of IV Corps, took instructions from the Cavalry Corps and tried to find a route via Flesquieres. (This manoeuvre was attempted because it was mistakenly believed Flesquieres had been taken.) The unauthorised move by 1st Cavalry Division resulted in this division not being in a position to exploit the success in the 62nd Division’s area. I believe it is unforgivable for details such as from whom the 1st Calvary Division was to take its orders not to have been fully worked out or understood prior to the commencement of the battle. Part of this may be laid at the door of Lt-Gen Kavanagh, commanding the Cavalry Corps, and part was the responsibility of Maj-Gen Mullens, GOC 1st Cavalry Division.
The problems with the Cavalry were not confined to IV Corps; the same happened to the right with III Corps. The Cavalry Corps had a convoluted communications structure and its Headquarters were too far back. [14] Kavanagh also insisted on his Corps not moving until he gave the authorisation, which meant there was no ability for III Corps to directly instruct units of the Cavalry Corps. There were simply too many headquarters involved.[15]
It is also clear that the Cavalry regiments were held too far back. The nearest Cavalry Division, the 5th, was nine miles from the front line, whilst the 3rd Cavalry Division was 18 miles away. The cavalry was also slow in moving forward; it was nearly mid-day before the most advanced division, the 5th, which at that time was still a mile from the original British front line, received orders to advance. There are, of course, many of reasons for this, such as roads clogged being with traffic. But, if exploitation beyond the St Quentin Canal was required under the orders, every possible step should have been taken to ensure the Cavalry were on hand to take advantage of what was likely to be, at best, a fleeting opportunity before the Germans were able to re-establish their trench lines.
Part of the tank plan for Cambrai involved the designation of two tanks as bridging tanks. One tank from each of ‘C’ and ‘F’ Battalions of the Tank Corps was to carry rails and wooden planks in order to erect bridges. It would seem that these did not have the opportunity to undertake their intended operation. Once the 29th Division had secured the ‘British’ side of the St Quentin Canal, the Germans had, to a certain extent, managed to react. What turned out, after all, to be fleeting opportunities for passing the cavalry across the St Quentin canal were lost. At Marcoing, for instance, the main bridge was destroyed and other bridges were covered by machine guns; however a narrow but undefended and intact bridge was discovered. ‘B’ squadron of Fort Garry Horse was able to get across the canal and access German rear areas. Conceivably more than one squadron of cavalry ought to have been able to get across, as it took the 150 horsemen of Fort Garry Horse just five minutes to pass over this bridge. Elsewhere, the 7th Dragoon Guards managed to take other bridges but no exploitation took place.
The failure of the cavalry can be put down to Kavanagh’s lack of forethought on the communication issue and the physical constraints of inserting a large body of horsemen across barbed wire defences and a canal. However, what has often been called “The Cavalry Spirit” was clearly lacking at Cambrai in 1917.[16]
All this may ultimately have been to the advantage of the British. The cavalry alone would not have been likely to have inflicted a major defeat on the Germans behind Cambrai. Harassment of the rear areas may have been possible at best but the losses associated with this would surely have been disproportionate to the meagre results achievable. The fact that the cavalry was not decimated in actions beyond the St Quentin canal ensured it was available to help stop the German breakthrough on 30 November.
Undoubtedly the initial attack at Cambrai was a success; taking nothing away from the British this was partly due to the Germans being over-confident in their defences. The line at Cambrai was under-manned, and was held by tired or second-rate troops. The Germans were certain that the strength of the defences meant the British could only contemplate attacking after a lengthy preliminary bombardment, and this would give them ample time to bring the defending troops up to strength.
Whilst the Highlanders may count themselves unlucky to have come across a German artillery unit specifically trained in anti-tank gunnery, the British did to some extent, have themselves to blame. The Germans were on guard following their overhearing some wireless communications before the attack and from prisoners who may have some knowledge of the preparations for the attack captured prior to 20 November.
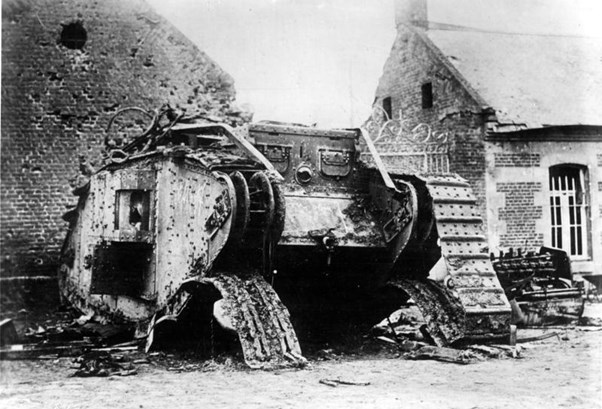
Above: 'Panzer' - a wrecked British tank
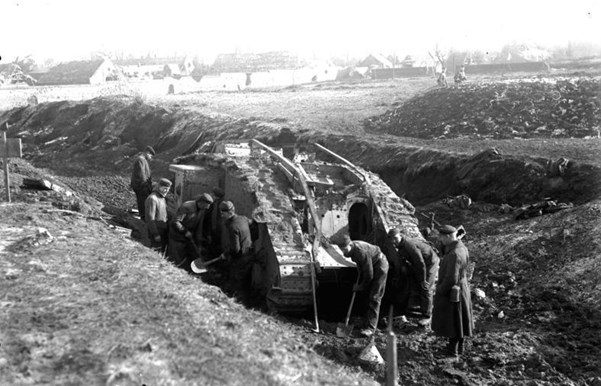
Above: German soldiers make preparations to recover a knocked out a British Mark IV tank
Despite Haig’s self-imposed promise to shut the battle down after 48 hours if success had not been achieved, in order to take the Bourlon Ridge the attacks continued. These soon started to take the form of the typical attritional battles of earlier in the war. While it was necessary for attempts to take Bourlon to continue, it was the over-emphasis on Bourlon that led to the British being taken by surprise by the Germans ten days after the initial attack.
Whilst Messines was “the first example of a completely successful Battle with limited objectives” [17] it may, in the eyes of Haig, have suffered from a certain lack of ambition. At this late date in 1917 another ‘bite and hold’ operation was preferable to a full-scale breakthrough attempt. I would suggest that Haig should have given more resources to IV Corps, in order to secure the Bourlon position. This, inevitably, would have been at the expense of III Corps which (with more resources) was effectively only tasked with securing a defensive flank to enable the Cavalry Corps to effect a break out. This change in allocation of resources, together with a more limited plan (without the ambitious cavalry exploitation), would almost certainly have ensured the Battle had a very different outcome.
By 30 November, Byng was in the process of withdrawing divisions as it seemed the battle was now over; the last British attack had gone in at Bourlon Wood on 27 November. Away on the right flank, in the area of VII Corps (commanded by Lt-Gen Snow), there were growing signs of enemy activity. Snow reported these matters to Byng who passed the information on to GHQ. [18] Possibly due to over confidence in the ability of the troops to deal with any counter attack, or possibly due to the belief that the right flank was not the important area, when compared to Bourlon on the left, little was done above Corps level to meet the impending crisis.
Above: Lt-Gen Snow
Above: Maj-Gen Sir Hugh Jeudwine
The troops on the ground who were to face the attack were now very tired; there had been no permanent relief of the 6th, 29th, 20th or 12th Divisions (all III Corps) which were still in the line. To the right, at the junction of III and VII Corps, the commanders of the 12th Division (Maj-Gen Scott) and the 55th (West Lancashire) Division (Maj-Gen Jeudwine) met on 29 November to discuss the inter-corps and inter-divisional boundary. It was recognised that the boundary was the most likely place for a German attack, as the Germans could easily gather unobserved. It was also the point where the British original front line was connected to the Hindenburg Trenches taken from the Germans in the original attack. The two Major Generals and Lt-Gen Snow realised that there was every likelihood of an attack at this point. They requested assistance from the Heavy Artillery of III Corps in putting down a barrage on the Banteux Ravine. III Corps declined this request on the grounds that no warning had been received from Third Army of an impending attack.
Jeudwine had an additional problem in that his division was holding a front of nearly six miles, which meant that it would be over-stretched in the event of a German attack on its front.
As mentioned, the German build up of troops had been observed and reported; however, the bombardment, because it built up very slowly, was already underway and becoming effective before it was recognised for what it was. [19]
The German barrage also deceived the British high command into believing the attack would fall along the whole of the front, including the sensitive Bourlon area. Snow’s warnings were disregarded and when the Germans launched their attack across bridges that should have been destroyed by the British, and from land that they should have made sure was under observation, surprise was achieved.
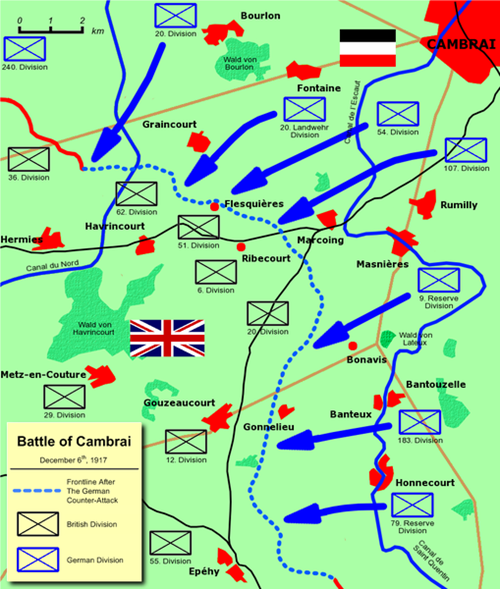
Map: German Counter Offensive
Out of a thick mist, and under a heavy barrage of high explosive and gas, the Germans attacked. Low flying aeroplanes were deployed to harass the defending troops. Infiltration tactics were used; these had already been tried on the eastern front and at Caporetto.
The Germans were attacking a British salient that contained many artillery batteries and much billeting for the troops; it was a crowded area. At the top of the salient, at Bourlon, the Germans attacked in a southerly direction, in the south they attacked in a westerly direction. The intention was to either trap the British in the salient or cause a major withdrawal. It is possible the attack at Bourlon was, if not a diversion, only a feint. It certainly does not seem to have been the major axis of the German thrust. Haig and Byng had become obsessed with Bourlon, and were very sensitive of any German attack here; they therefore neglected to pay sufficient attention to the south. If they had realised that a thrust on either of the two shoulders of the salient were equally dangerous they may have concluded that the 55th Division’s six mile front and the ground in front of Banteux were dangerous invitations to the Germans to launch an attack. Haig was clearly surprised by the Germans launching a counter-attack of such weight; he no doubt felt that after what the Germans had been through at Third Ypres they would not be in any condition to launch anything other than localised counter attacks.
It would seem that the Germans gave plenty of clues as to their intentions; it is unfortunate that GHQ and Third Army had deceived themselves into believing either that the Germans were incapable of launching a major attack, or it would fall on the Bourlon area.
The attack at Bourlon was repulsed primarily through the large amount of artillery at the disposal of IV Corps [20] but despite this, ground eventually had to be surrendered here. The attack in the south in contrast achieved spectacular results for the Germans.
It was only through the intervention of an ad hoc formation known as ‘Vincent’s Force’, together with Tanks and Cavalry (both of which were in the process of being withdrawn when the Germans struck), that the hole in the line between III Corps and VII Corps was plugged. Other elite formations also made heroic stands (29th Division) or counter attacks (Guards Division) and it was through individual and collective acts of courage in these and other less elite units that the German attack was halted.
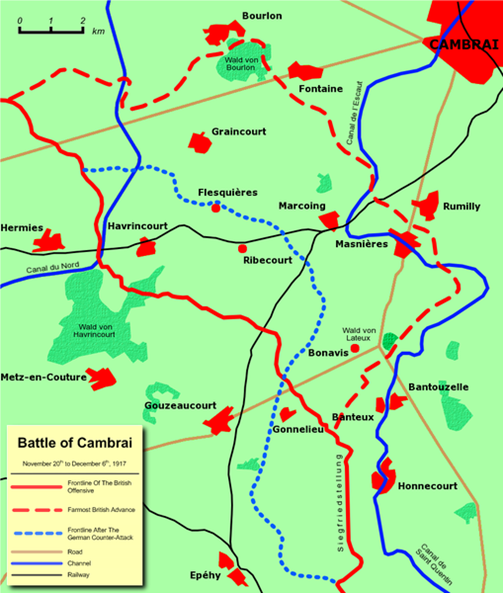
Map: Cambrai Front Lines
The German success was partly due to the British high command being deceived and unprepared despite receiving warnings of the impending attack and partly down to German tactical advances.
The German use of infiltration tactics was the prototype for their attacks on the Western Front in 1918. Bruchmuller (who was not present at Cambrai in November 1917) was to develop the artillery tactics into a formidable barrage that would overwhelm the Allies on several occasions in early 1918. [21] It would seem, however that the Germans did not learn sufficiently well from their defeat on 20 November to counter the British at Amiens on 8 August 1918 and the otherm subsequent actions during the ‘Hundred Days’.
The breach of the line made between III Corps and VII Corps and the subsequent plugging of the gap is a similar – although smaller scale – version of the events of 21 March 1918. The sacrifices made by the men who were asked to ‘do the job’ were not in vain, as lessons were learned that would be applied in the following spring.
For the British, Cambrai was an invitation to learn offensive as well as defensive lessons.
The offensive lessons, honed down to a fine art at Hamel in July 1918, were of much benefit and ultimately ensured the war was won in 1918 rather than in 1919.
Article by David Tattersfield
Further reading:
Drunk as a Lord? The dismissal and redemption of Lord Edward Seymour
Notes
[1] “The First Tank Battle. Cambrai 1917.” Robert Woollcombe. London 1967 (hereafter “Woollcombe”). Page 22
[2] Woollcombe pg 46
[3] Woollcombe pg 34
[4] Woollcombe pg 30
[5] Woollcombe pg 31
[6] “Sound Ranging 1914-1918” Peter Chasseaud. Stand To!, The Journal of the Western Front Association, number 30 (Winter 1990). Western Front Association members can read this and other articles via the Log-in page
[7] Woollcombe pg 50
[8] “General Harper and the failure of the 51st (Highland) Division at Cambrai, 20 November 1917.” Bryn Hammond. Imperial War Museum Review no 10, 1996
[9] “Following the Tanks. Cambrai. 20th November – 7th December 1917.” Jean-Luc Gibot and Philippe Gorczynski. English translation by Wendy McAdam. Arras 1999. (Hereafter “Following the Tanks”). Page 43.
[10] “Command and Control on the Western Front. The British Army’s Experience 1914-1918” Edited by Gary Sheffield and Dan Todman. London 2004. (Hereafter Command and Control) pg 111
[11] “Uncle Harper at Cambrai, A reconsideration.” John Hussey. Stand To!, The journal of the Western Front Association, number 62 (September 2001). He singles out:
Brig-Gen CD Baker Carr in “From Chauffeur to Brigadier” (1930),
Capt BH Liddell Hart in “The Real War” (1930) and
Maj-Gen JFC Fuller in “Memoirs of an Unconventional Solider” (1936).
[12] Following the Tanks. Page 150 and 151.
[13] “The Ironclads of Cambrai.” Bryan Cooper. London 1967.
“A Wood called Bourlon.” William Moore. London 1988.
“Cambrai. The First Great Tank Battle.” AJ Smithers. London 1992.
[14] “The Great War Generals on the Western Front 1914-1918” Robin Neillands. London 1999. pg 415.
[15] Woollcombe pg 138
[16] Woollcombe pg 136
[17] Command and Control, pg 182
[18] Woollcombe pg 175
[19] Woollcombe pg 183
[20] Woollcombe pg 188 lists the divisional artillery of 36th, 40th, 51st, 62nd, and Guards which had remained in support, and the artillery of the divisions in the line (2nd, 47th, and 59th) were available as well as the Corps Artillery.
[21] Woollcombe pg 195 quotes Ludendorff: “Our action had given us valuable hints for an offensive battle in the west…”