Evidence in Camera. A cautionary tale
During the 1980-81 academic year, the Extra-Mural Department of the University of Hull sponsored a short course on World War One. As a result of one of the discussions held during the course it was decided to collect together some of the greatest war photographs, and note the accreditations given them by authors. The class discovered some amazing discrepancies, and their findings might well serve as a warning to future writers (or their publishers) to be careful to watch what they use to illustrate their works.
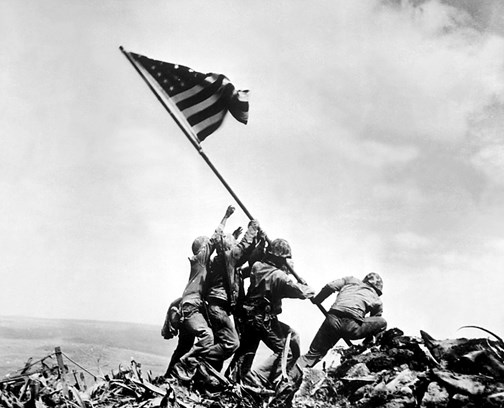
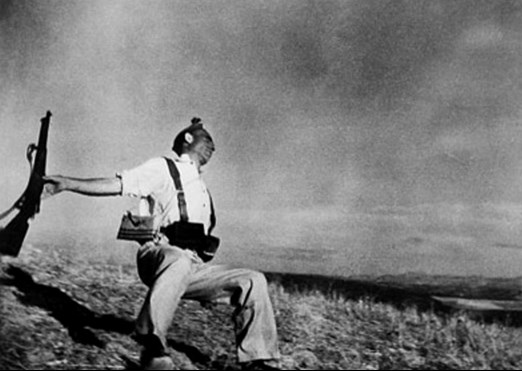
The Hull class looked for photographs to compare with, say, Joe Rosenthal’s famous picture of the Stars and Stripes being planted on Iwo Jima (1) and Robert Capa’s ‘Moment of Death’ (1936), which showed the last moments of a Loyalist soldier in Spain (2).
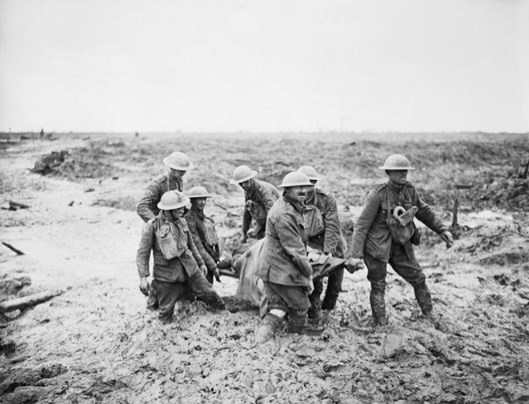
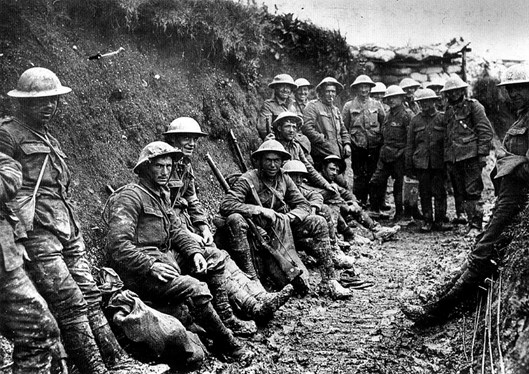
There was almost complete agreement about what the best dozen or so photographs were. One was of the stretcher bearers ‘following the Battle of Pilckem Ridge’ used by Leon Wolff (3) and John Ellis (4); another was of troops resting in support trenches before going into the line on the Somme (Mr Ellis used both these photographs on his cover) (5).
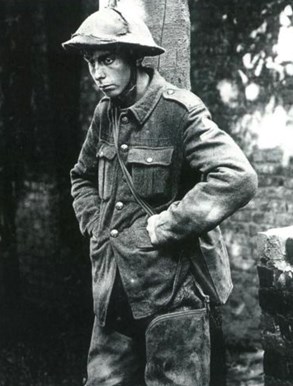
A third was that of the British soldier that appears on the cover of Paul Fussell’s The Great War and Modern Memory (OUP, 1975). Another was that famous shot of steel-helmeted troops walking over duckboards in a shattered wood (6).
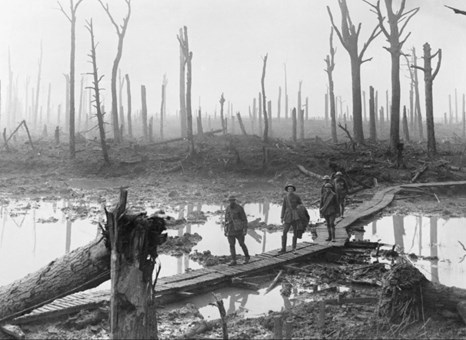
Michael Houlihan used this last image and gave it its correct Imperial War Museum accreditation - Negative E1220: ‘Scene of desolation in a wood, showing damaged trees, mud, etc. Chateau Wood, Ypres, 29th October, 1917’ (6). The many books which also used the illustration were generally correct in their accreditations. A.L.P.Taylor simply captioned it ‘Desolation after a battle - a strafed wood’ (7), but W.H.A. Groom rather oddly wrote ‘Passchendaele fields, grassless, shell holed and soggy earthed’ (8). Corelli Barnett identified the troops as Australian (9), with which an Open University text book agreed (10). Malcolm Brown’s accreditation, which does not necessarily conflict with that of Barnett, might be said to be slightly misleading (11). He wrote ‘This is Chateau Wood .. the picture, by a Canadian photographer was taken on 29th October, 1917.
The picture of Chateau Wood, then, was usually presented correctly, and no-one reading the captions would be seriously lead astray.
That was not the case, however, with one which some considered (I am one of them) the most dramatic of all World War One photographs. This has been used (understandably) over and over again, on books (12), in books, and in journals and newspaper articles (13). It shows British steel-helmeted troops going out of a shallow trench, in daylight, into No-Man’s Land, through a not-too-heavy concentration of barbed wire. The photograph is taken from behind, so not all the equipment being carried is visible, yet the soldiers have no packs on their backs. Readers of this journal will be familiar with the stories of how British troops were laden down during the Somme battles, carrying a load of som 65 lbs (14), and to them it will come as something of a surprise to read A.J.P. Taylor’s caption (though it is only fair to say he did not say it was taken on 1 July) which reads: ‘British troops go over the top in the Somme battle. Their dead bodies were to festoon the wire’ (15).
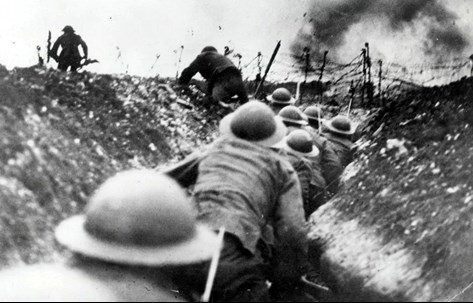
Other authors, less exalted than A.J.P.Taylor, use this famous photograph to illustrate their work on the Somme Battles. R.Hoare in World War One (1973) tells his readers that is is of ‘Tommies going over the top in the Battle of the Somme. A way had been cut through their own barbed wire but thousands died because the German wire had not been destroyed by bombardment’ (p.11) which certainly suggests he intended it to illustrate the events of 1 July. Field Marshall Montgomery used it in a non-committal kind of way (16) as did R.N.Hudson who captioned the picture: ‘A fighting patrol leaving a front-line trench (17). Now the photograph, as can clearly be seen from the troop’s equipment, is of a raid or a patrol, as Mr Hudson noted, not a major attack, and this is how it is presented by two other authors. C.Martin, in his book on the Somme wrote thus: ‘An officer leads his men “over the top” on a trench raid’, (18) while John Ellis said it was of British troops leaving ‘from a sap to attack the German positions on the Somme’.(19)
Now, Messrs Ellis and Martin are half right - but only half right - and any reader who believed troops depicted in that marvellous photograph were in Picardy would be wildly misled. The fact is the shot had not even been taken when the Somme battles were over. It was taken the following year, near Arras, as many other authors have stated - but even they are not consistent about exactly who the troops were and when they went over. Here are some typical accreditations (all of them call it a raid):
- The photograph shows the 9th Cameronians going over the top during a day light raid near Arras on 24 March 1817. (20)
- British troops leaving their trench on a raid of the enemy lines near Arras on 11 April 1917. (21)
- A daylight raid. (22)
- Raiding party of the 9th Battalion, the Cameronians (Scottish Rifles) going over the top, 11 April 1917. (23)
- The 9th Battalion, the Cameronians (the Scottish Rifles) make a dayling raid. More than anything, raids destroyed live and let live. This was the other face of trench warfare, and life could be nasty, brutish and short on active sectors. (24)
I thought it worthwhile to check contemporary publications to see how they accredited the photograph(s). The War Illustrated of 28 April, 1917, used it to illustrated incidents in its account of the Battle of Arras. Under the general heading ‘Animated Scenes in the Great Artois Advance. British Official Photographs’, it captioned the picture: ‘British raiding-party setting out to keep the Germans “jumpy”. At the moment of starting an enemy shell burst just ahead.’ The Illustrated War News, 18th April 1917, contained some more information. In that Journal no date was given for the incident depicted, but the photograph appeared as one of a set of four showing ‘A typical British trench-raid'. The four pictures showed troops ‘Awaiting the Word’, starting off (our picture), ‘getting clear of the sap and beginning to race toward the enemy’s lines’, and ‘returning after the raid’. No more information is given about who the photographs was, what the equipment was, or when exactly the action took place, but Sir John Hammerton’s The Great War …. ‘I Was There!’ (Amalgamated Press, [1938-39]) Vol.2, p.1003, gave some. This work reproduces a fifth photograph which is quite obviously from the series. Here is its caption:
For these men zero hour meant death
These men of B Company, 9th Scottish Rifles, are going forward near Cuthbert Crater, in front of Arras, on April 6, 1917, for … a trench raid … a few seconds after the photograph had been taken a shell burst in the trench and most of them were killed, including the man who took the photograph. His camera was afterwards retrieved and the film developed.
Sir Ernest Swinton (ed.), Twenty Years After (Geoerge Newnes, [1936-38]) Vol. 2, p.876 published two of the series, with these captions:
Near Arras, on March 24th, 1917, a raiding party waits in a sap for the signal to advance. On this occasion the Official Photographer followed them. Unfortunately, a few moments later a shell fell short, killing seven men … The men in these pictures belong to the 10th Scottish Rifles.
So, according to the sources quoted which opted for Arras, there could have been depicted one of two battalions of the Scottish Rifles, and the incident could have taken place on any of three dates. The writer of this piece asked the Keeper of the Photographs at the Imperial War Museum to give him the official IWM accreditation. Here it is (two parts of it are hand written). It is interesting to note that an IWM publication already quoted (Coppard fn 23) does not conform with IWM’s own accreditation!
IWM Q5100. Crown Copyright, 10th Scottish Rifles. An officer leads the way out of a sap and is being followed by the party. Shells bursting. 24.2.17
Errors then, great and small, have crept into books both great and small. How does this happen? Perhaps like this. A writer wants a photograph to illustrate what conditions were like generally, so he chooses one, but uses it in a book, say, on the Somme, on Arras, on the Salient, or in a chapter devoted mainly to one of them. There is nothing wrong with this, that is the way Montgomery used the raiding-party picture, but then along comes another author who recognises the quality of the photograph, decides to print it himself, and, because it was a book (or chapter) on a particular battle, concludes that it was taken during that battle. He accredits it thus, and a chain of errors has started. You can see how it can happen.
There is a marvellous photograph (it was in our chosen dozen) of Canadian troops fixing bayonets, for example, which was used in War Illustrated towards the end of the Somme Battle (25), and many times since (26).
It was also used on the cover of Kenneth Macksey’s Fine book Vimy Ridge (Pan/Ballantine, 1973). How easy it would be to assume that because Mr Macksey used it in a book about Vimy, it was of Vimy!
This kind of thing happened with one of the most slapdash historians of the twentieth century, and he brought the art of misunderstanding and misrepresenting source material to a peak. This was R.S.Lambert who wrote a dreadful biography of George Hudson, the famous ‘Railway King’. Lambert wanted a picture of a portrait of Hudson by Francis Grant, and he saw one in a book on the North Eastern Railways simply captioned ‘George Hudson’ (27). He knew that a portrait of the Railway King hung in Mansion House at York, so lifted Tomlinson’s illustrations, reproduced it (28), and titled it ‘The Portrait by Francis Grant, A.R.A., which hangs in the Mansion House, York’. But he clearly never checked there, because the picture in the Mansion House is totally different to the one he used - which in fact hung in the Wear Commissioner’s offices in Sunderland!
Lambert has recently paid the price for his shoddiness at the hands of Mr Alan Gebbie and others (29).
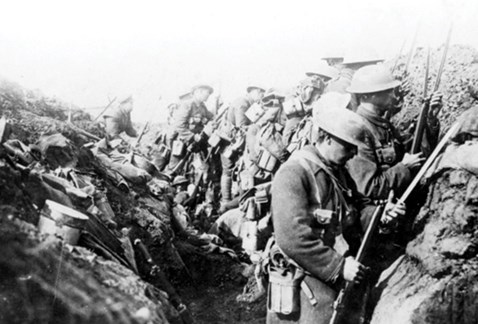
Another oft reproduced photograph, which will be well-known to readers of this Journal, is that of a howitzer in action on the Somme.
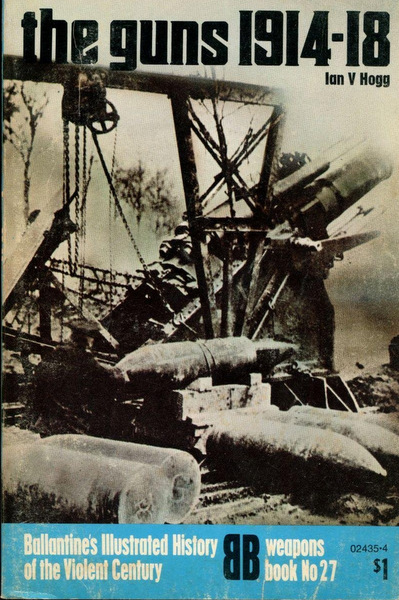
It is used by Lt-Gen Farrar-Hockley (30) and Mr Harris (31) amongst others, and it is on the cover of an excellent work by I.V.Hogg (32). All these authors show the gun firing from left to right, which is undoubtedly correct. R.J. Hoare, however, shows it firing from right to left, an easy error to make, but an error nevertheless (33).
All these notes are intended to put readers and authors on their guard, because many of the photographs used by war historians may be as misleadingly presented as the few we have looked at. It is very easy to jump to conclusions, to make unwarranted assumptions, and then find that, maybe years later someone writes to a Journal like Stand To! To point them out. Perhaps reading these notes might stop one or two of us from adopting a Lambert-like approach.
This article first appeared in Stand To! 3, in December 1981. Stand To! is one of several magazines available for free to members of The WFA. If you want to see more articles like this one, you may wish to become a member of The Western Front Association.
References:
- The photograph gained Rosenthal a Pulitzer Prize. The date of the incident was 23 February 1945.
- It is reproduced in many works, e.g. Life Library of Photography: The Great Themes (1972) pp.232-33. It is titled differently in e.g. Peter Pollock, The Picture History of Photography (1977) p.162.
- Leon Wolff, In Flanders Fields (Longmans, 1959)
- John Ellis, Eye-Deep in Hell (Fontana, 1977. 2nd Ed.)
- It is used twice in e.g. Corelli Barnett, World War One: The Story of the Great War 1914-18 (1979). The aforementioned stretcher bearer photograph is also used.
- Michael Houihan, World War 1: Trench Warfare (Ward Lock, 1974) p.83
- A.J.P.Taylor (Editor-in-Chief) The Illustrated History of the World Wars (n.d.) p.167
- W H A Groom, Poor Bloody Infantry (Kimber, 1976) p.97
- Barrett, op cit p.116
- Open University Text Book A301 24-26 p.54
- Malcolm Brown, Tommy Goes to War (Dent, 1978) p12
- E.g. it is used on the dust-wrapper of T.P. Marks, The Laughter Goes from Life (Kimber, 1977)
- E.g. in Radio Times where it was used recently to advertise ‘Company K’ a play based on the novel by William March about American troops in France ‘near Verdun’.
- See e.f. A.H.Farrar-Hockley, The Somme (Batisford, 1964) p.88
- Taylor, op cit p.102. In another work he simply captioned it ‘British troops go over the top’. A.J.P.Taylor The First World War; an illustrated history (Hamish Hamilton, 1963).p.137
- Montgomery of Alamein, A History of Warfare (1968) p.475 ‘British infantry go forwa.rd from their trenches to an attack across no-man’s land’.
- R.N.Hudson, The Bradford Pals (n.d) It is only fair to say that Mr Hudson does not say the photograph was taken on the Somme.
- C.Martin, Battle of the Somme (Wayland, 1973) p.25
- Ellis, op cit p.96
- Brown, op cit p.98. As will be seen later the photograph under discussion is in fact one of a group, and this source and the next four use one of the grouip. I have regarded them as one her. It does not seem to me to spol the discussion which is on accreditaionts.
- Houlihan, op cit, p.108
- Brig-Gen E.L.Spears, Prelude to Victory (Cape, 1939). It is used in a section of the book on Arras.
- George Coppard, With a Machine Gun to Cambrai (HMSO, 1969)
- A.E.Ashworth, Trench Warfare: The Live and Let Live System (Macmillan, 1980).
- War Illustrated, 4 November 1916.
- E.g. Brown op cit p.154
- Tomlinson’s North Eastern Railway (1967 ed.) plate XXIII.
- Mr Alan Gebbie, a professional photographer at York University proved beyond doubt that the illustration in R.S.Lambert, The Railway King (1932) was a copy of Tomlinson’s illustration.
- In successive issues of York History.
- Farrar-Hockley, op cit p.112
- John Harris, The Somme: Death of a Generation (Hodder & Stoughton, 1966) p.69
- Ian V. Hogg The Guns 1914-18 (Ballantyne, 1971). It is also reproduced on p.58.
- R.J.Hoare, World War One (Macdonald, 1973) p.9
Becoming a member of The Western Front Association (WFA) offers a wealth of resources and opportunities for those passionate about the history of the First World War. Here's just three of the benefits we offer:
Identify key words or phrases within back issues of our magazines, including Stand To!, Bulletin, Gun Fire, Fire Step and lots of others.
The WFA's YouTube channel features hundreds of videos of lectures given by experts on particular aspects of WW1.

Read post-WW1 era magazines, such as 'Twenty Years After', 'WW1 A Pictured History' and 'I Was There!' plus others.


