


In the material scanned at the Imperial War Museum there is a huge map. It is cut into 20 separate rectangular tiles stuck on card; these are joined with linen hinges to allow stowage in its purpose made box.
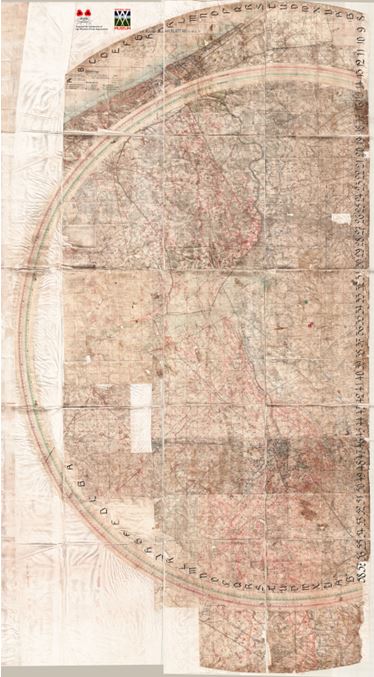
When unfolded it measures 3.0 x 1.64 metres or about 118” x 64”. Drawn to a scale of 1:20,000 and dated 29 June 1917, is depicts Ypres and the land south down past Wulverghem and all the land north of Ypres, right up to the coast, including the Houthulst Forest.
Around the unfolded map are two large arcs, one in green, the other in red. The red arc is centred on two small red circles in the Houthulst Forest positioned next to each other at map references 20.O.34.d.44.99 and 20.O.34.b.88.41. A straight line is drawn through both positions and extends past the spire of Saint Peter’s and St. Paul’s church in Elverdinge down to the arc around the map.
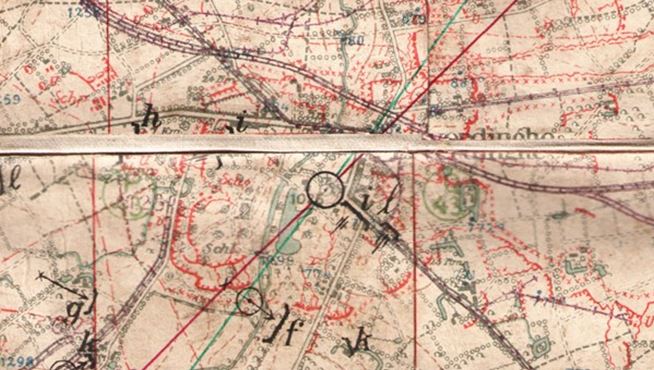
Above: Lines cross at the assumed aiming point at St. Paul’s church in Elverdinge
Another line starts at St. Joseph’s church in Jonkershove, passes through the spire of Saint Peter’s and St. Paul’s church in Elverdinge and onward to the green arc. There bearings in degrees can be read directly. It is assumed that Elverdinge Church is the zero point for aiming. The arcs are not centered on the same place and the geometry of the arcs is far from clear.

Above: St. Joseph’s church in Jonkershove is in the green circle and the assumed site of the guns in red.
The scanner used on all the maps at the IWM was far too small to scan this huge map in one go. Each tile was scanned and the map reassembled in software to display the whole thing. Such are the ravages of time that noticeable distortion has occurred in the map so the reassembly is not perfect but still good enough to see the purpose of this amazing item.
It is known there were two 42cm Big Bertha howitzers operating in Houthulst Forest north of Ypres and that they caused a lot of damage to the town.

Various sources quote different detail for these guns. They were supposed to be named after Bertha Krupp, owner and heiress of the Krupp industrial empire but this story may just be fanciful.
What is sure is that the German designed and built large calibre howitzers specifically to destroy strong concrete fortifications and were used to great effect against the forts of Liege. The original weapons tagged Big Bertha, the Gamma-Gerät howitzer, was very heavy and could only be moved by rail. A lighter version, Type M-Gerät 14 (M-Equipment 1914) had a shorter barrel, an upgraded breach and could be moved dismantled by road on 5 separate vehicles. It is reported that when firing lighter shells, the M-Gerät 14 had a range of 12.5Km.
No supporting documents are known to be associated with the map so there is no proof that it actually shows the location of two Big Berthas, but the fact that numerous allied artillery targets are marked on the map, many battery positions, and that the arrangement and positioning of the arcs is ideally placed for long range guns shows at the very least that it is likely, added to the knowledge that Big Berthas were deployed in the area. The church spire at Jonkershove is well placed for the battery commander to take bearings on targets of choice with the church spire in Elverdinge serving as a convenient zero-point to allow target bearings to be passed to the guns. The church at Jonkershove was destroyed in the war, but assuming the spire was 30 metres tall, that would have provided a commanding view of Ypres and most of the surrounding area.
The map is displayed on TrenchMapper. To use it, first move to the Houthulst Forest by putting Houthulst in the search box. Then, using the sequence Main Menu->Jump To->Specified Map ID, insert the ID m_018234.
Alternatively a 'quick link' to the map is here m_018234
This will show Jonkershove and the gun positions. Follow down the lines past Elverdinge and the bearings can be read straight off the relevant arc.
If you use the Bearing a Distance tool, ![]() it can be easily seen that the further gun is 12,430 yards or 11,365 metres from the Cloth Hall, well within the claimed 12,500 maximum range.
it can be easily seen that the further gun is 12,430 yards or 11,365 metres from the Cloth Hall, well within the claimed 12,500 maximum range.
Around the arc there are numbers that align vertically with each meridian and up the right had side is a set of letters that align with the parallels, allowing for a simple square designation. By this means the Cloth Hall is in square U46.
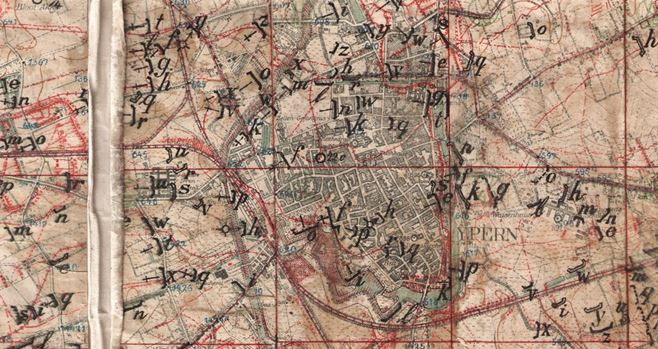
Above: Ypres with marked targets
Central Ypres in square U 46
The map was clearly heavily used as indicated by the red and green circles and the battering of the whole assembly. It is clearly intended for artillery. Whether is was for two Big Bethas is not certain but like so many intriguing aspects of the Great War, this should provide if nothing else, a solid basis for further research.
Howard Anderson, August 2024